Want to have a manicure with a sea breeze? This golden beach wave manicure combines the glitter of golden sand and the agility of waves. The steps are clear and easy to operate. You can easily get the same style by following it!
1. Create a delicate base color
First, choose a gentle milky white nail polish as the base. I recommend CHROMÉCLAIR’s Milk Cream White, which has a silky texture like cream. Apply an appropriate amount of gel to the center of the nail surface and gently spread it to the edge with the brush to ensure that every inch of the nail surface is evenly covered without leaving brush marks. After applying, immediately put it into the phototherapy lamp and shine it for 30-60 seconds until it is completely dry.

This step is the basis for all subsequent decorations, so make sure it is flat and smooth.
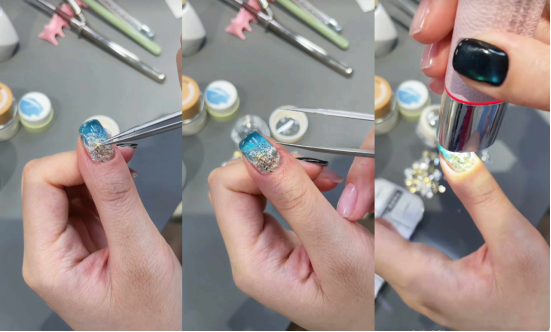
2. Add a touch of gold sand texture
Next, take out the “gold sand beach” part – take out the glitter glue containing gold foil. Use a small brush to apply a small amount and carefully apply it to the diagonal position of the nail (such as the upper left or lower right). Use the brush head to spread it gently while applying, so that the gold foil and glitter are naturally distributed, with a dense and shining feeling without being too messy.

When you are satisfied, put it under a phototherapy lamp to dry it and fix this “golden beach”.
3. Smudge the ocean base color
It’s the “ocean” turn! Choose a refreshing blue cat’s eye nail polish. CHROMÉCLAIR’s #deepseabluecat’seye is a great choice. The color is a clear and layered blue. Apply it on the other diagonal of the nail (opposite to the gold foil sequin area). Be careful not to make the edge too hard. Immediately after applying, use a clean brush to gently sweep over the junction.

Let the blue and the background color transition naturally, just like the feeling of sea water slowly flowing onto the beach.
4. Create a dynamic cat’s eye
Take out the matching cat’s eye magnet, and place it on the left and right sides of the nail for 2-3 seconds to absorb two wide light bands. Then keep the magnet parallel to the nail surface and slowly push it from the fingertip to the nail root, so that the light bands gradually merge into a gradient cat’s eye effect.

It looks like the sheen flowing from the deep sea. After confirming the effect, place it under a light therapy lamp to dry.
5. Make a three-dimensional bas
Choose a thicker construction base gel and apply it slightly thicker on the entire nail surface (no need to pursue absolute uniformity, it will be adjusted later). Don’t rush to shine the light after applying it, this layer of base gel will provide three-dimensional support for the wave effect.

6.Draw realistic waves
Take a special wave glue (newbies are advised to choose one with moderate fluidity), first wipe off the excess glue on the brush head with a tissue, leaving only a little on the tip of the brush. Gently apply it along the boundary between the gold foil area and the blue area, allowing the glue to spread naturally to both sides, forming wavy white lines – this is the “wave”! You can use the brush head to gently tap the edge,Make the waves more natural.

When you are done, dry them under a light therapy lamp.
7. Enhance gloss protection
After the sea spray glue is completely dry, apply a thin layer of the previous construction base glue on the nail surface to fill in the slight bumps and make the nail surface smoother. Then apply a layer of transparent glass sealer, and brush the brush head from the root of the nail to the fingertip at a uniform speed to ensure complete coverage.

This step can instantly brighten the nail art and protect the underlying pattern.
8. Decorate with marine elements
Take out the diamond glue and use tweezers to take a little bit (not too much, otherwise it will overflow), first dot where you want to put the ornaments, then stick a small starfish ornament, then match it with a mini shell, and finally embellish the gap with a few small pearls,
Just like treasures scattered on the beach. After gluing, put it in the light therapy lamp to dry and fix all the accessories.
9. Reinforce to prevent falling off
The last step is crucial! Take the hard sealer and use a fine brush to carefully “slide” along the edges of all the accessories.

Let the sealing layer wrap around the bottom of the jewelry to completely eliminate the risk of falling off. After drying, the entire manicure is complete!
Look at the finished product – the golden “beach” shines in the sun, the blue “sea water” flows with luster, the white “waves” are stacked, and the embellishment of starfish and shells, as if the entire summer beach has been moved to the fingertips, delicate and smart,

Where to Buy HEMA Free gel polish?
It is especially recommended to use with the CHROMÉCLAIR nail polish series products. Their polish has a fine texture, high color saturation, and is non-toxic and hypoallergenic, so it is safe to use. Even beginners can easily use it, and it is a good helper for creating exquisite manicures. Hurry up and give it a try!