This time, we will show you the complete process of creating “Devil’s Eye” nail art. By combining the characteristics of cat’s eye gel with painting techniques, we will create unique nail art with a mysterious and cool feel.
Step 1: Base color and first layer of cat’s eye gel
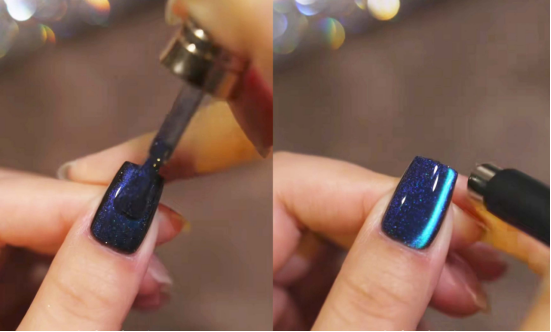
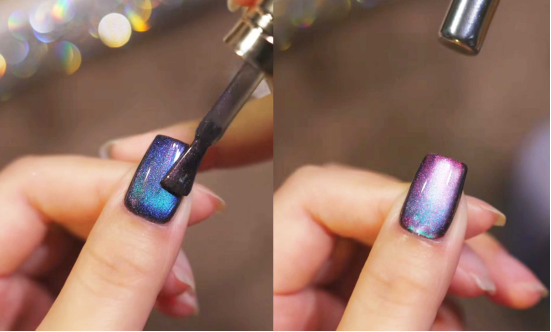
First, apply black gel polish to the nails (apply the black gel polish gel evenly and dry it to provide a dark base for the cat’s eye effect and enhance the gloss contrast).

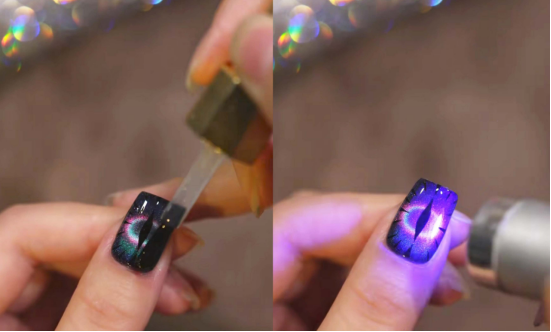
Breng vervolgens blauw aan gelpolish voor kattenogen gel (I used CHROMÉCLAIR’s Hema-vrije gelpolish CE-06, met een verfijnde kleur van hoge kwaliteit, een goede vloeiing en gemakkelijk voor beginners om gelijkmatig aan te brengen. Het is ook niet giftig en gezond). Gebruik een magneet op het nageloppervlak: houd de magneet dicht tegen het nageloppervlak,
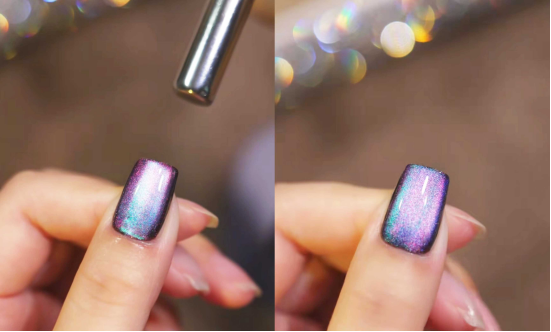
Nadat je het brede licht naar buiten hebt gezogen, duw je de magneet voorzichtig van het topje van je vinger naar de basis van je nagel.
Recommended next step
Build the Nail Art Look Kit
Tutorial looks need more than a color bottle. Choose the color, art detail, transfer or sticker step, and a top coat as one look kit.
- Choose the main color or set.
- Add the art detail: sticker, transfer gel, magnet, or brush.
- Seal the finished look with top coat.
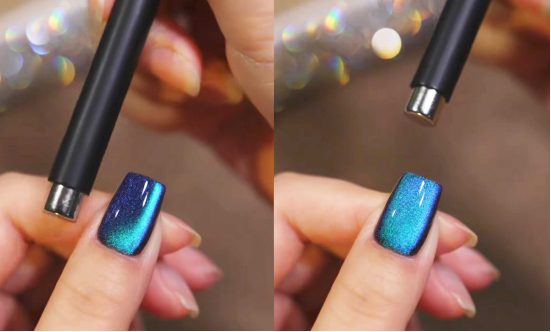
Let the light and shadow of the cat’s eye extend from your fingertips inward to create a gradient effect, then dry this layer of gel polish.
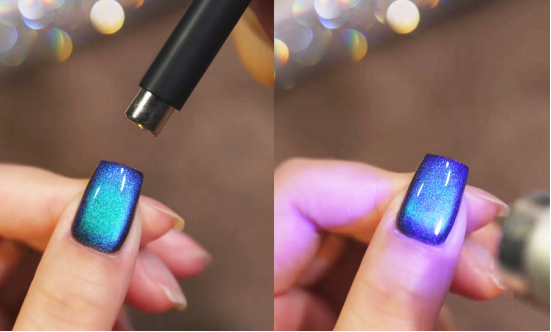
Step 2: Apply a second layer of cat’s eye gel to enhance the layers
Next, apply a coat of purple cat’s eye gel polish (CE-10). Use the magnet to draw out the wide light (repeat the magnetic attraction action similar to the first step to allow the second layer of cat’s eye gloss to overlap with the first layer in terms of color and light and shadow).
At this point, you can see that the base color of the nail has become richer, and the cat’s eye luster shows a variety of changes from different angles—as the viewing angle changes, bands of iridescent colors such as blue and purple flow, laying the foundation for the subsequent “devil’s eye” design.
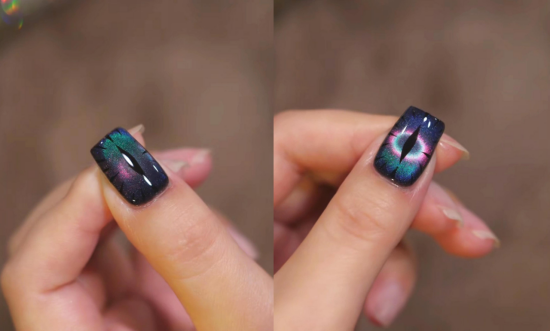
Stap 3: Creëer een magische dubbele halo met twee magneten
Take two magnets that attract each other and place them close to your nails at a specific angle. Use the magnetic force to guide the magnetic powder in the cat’s eye gel to create a “magical double halo” effect.
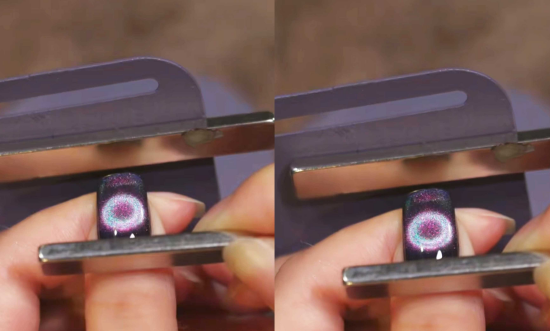
Deze stap creëert een ringvormig gelaagd effect op het nageloppervlak, wat de verfijning en elegantie van de manicure direct verbetert. In het licht glinstert het als het irispatroon buiten de pupil.
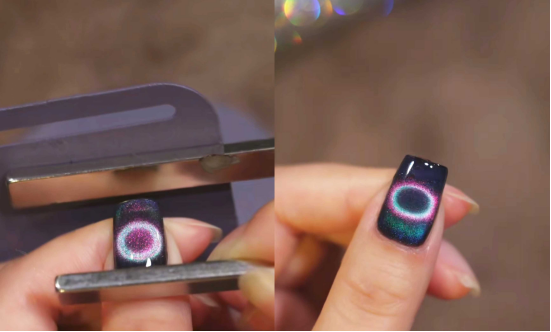
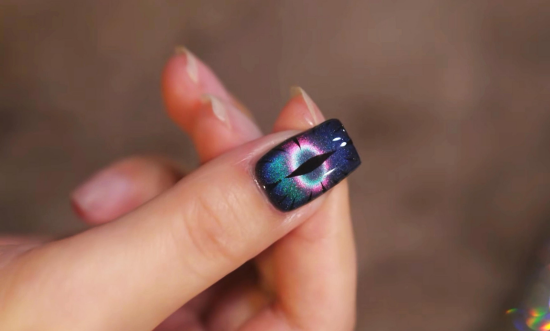
Step 4: Draw the devil’s eye to add a thematic touch
Using black nail art glue and a fine-tipped nail art pen, draw the “Devil’s Eye” design at the center of the nail: first outline the vertical, elongated pupil shape, then gently blend or refine the edges to enhance the eye’s intimidating and mysterious appeal. This step transitions the nail art from a vibrant base color to a story-driven thematic design, infusing the overall style with a cool, edgy vibe.

Afwerking
Eindlaag (breng een toplaag van glanzende nagellak en laat het uitharden onder een UV-lamp om het nagelkunstontwerp en de glans te beschermen en de duurzaamheid te verlengen).
And there you have it—the “Evil Eye” nail art is complete! The mysterious cat-eye effect paired with the unique devil eye design makes this nail art a real eye-catcher in everyday life. If you’re interested, why not give this technique a try.
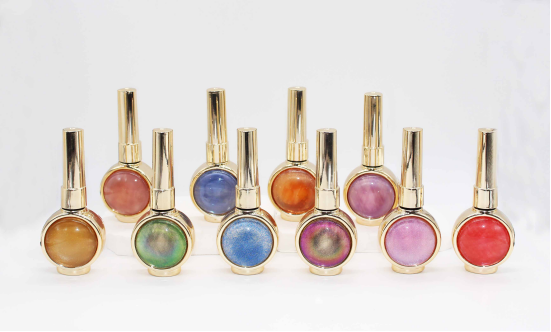
In the tutorial, I used CHROMÉCLAIR’s HEMA-vrije gelpolish. Their products are safe and hypoallergenic (HEMA-free & TPO-free), environmentally friendly, and free of irritating and harmful ingredients, protecting the health of your nails. There is a wide range of colors to choose from, keeping up with the latest trends, so you can use them with confidence and look good!
Als je problemen ondervindt tijdens het proces, kun je de onderstaande instructievideo bekijken. Als je de handleiding nuttig en leuk vindt, geef dan een duim omhoog, sla hem op en abonneer je op mij. Tot de volgende keer!