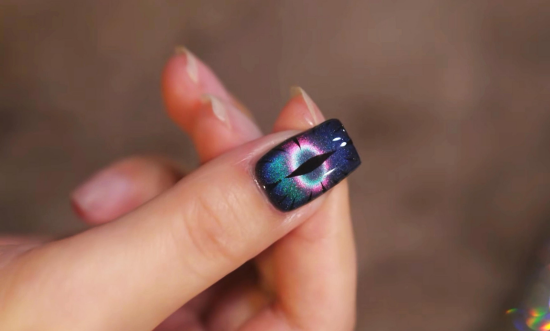
This time, we will show you the complete process of creating “Devil’s Eye” nail art. By combining the characteristics of cat’s eye gel with painting techniques, we will create unique nail art with a mysterious and cool feel.
Step 1: Base color and first layer of cat’s eye gel
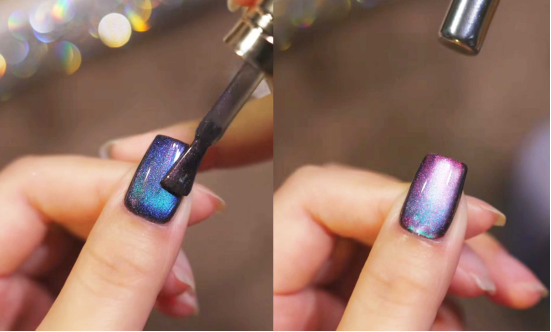
First, apply black gel polish to the nails (apply the black gel polish gel evenly and dry it to provide a dark base for the cat’s eye effect and enhance the gloss contrast).

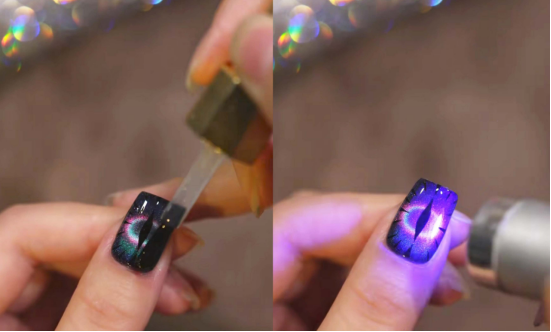
Appliquer ensuite le bleu vernis gel yeux de chat gel (I used CHROMÉCLAIR’s Gel Polonais sans Hema CE-06, qui a une couleur sophistiquée et de haute qualité, une bonne fluidité et est facile à appliquer uniformément pour les débutants. Il est également non toxique et sain). Utiliser un aimant sur la surface de l'ongle : tenir l'aimant près de la surface de l'ongle,
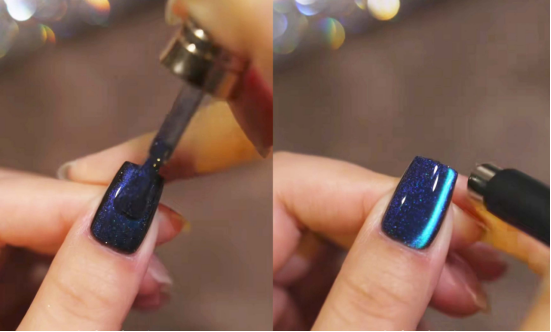
Après avoir aspiré la lumière large, poussez doucement l'aimant du bout de votre doigt vers la base de votre ongle.
Recommended next step
Build the Nail Art Look Kit
Tutorial looks need more than a color bottle. Choose the color, art detail, transfer or sticker step, and a top coat as one look kit.
- Choose the main color or set.
- Add the art detail: sticker, transfer gel, magnet, or brush.
- Seal the finished look with top coat.
Let the light and shadow of the cat’s eye extend from your fingertips inward to create a gradient effect, then dry this layer of gel polish.
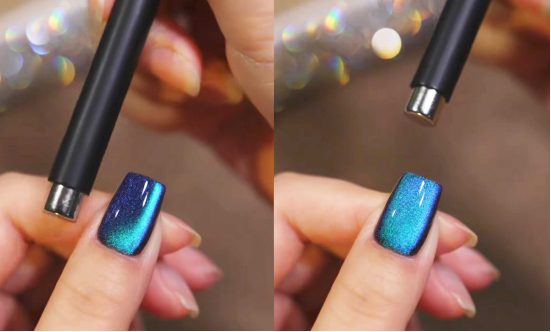
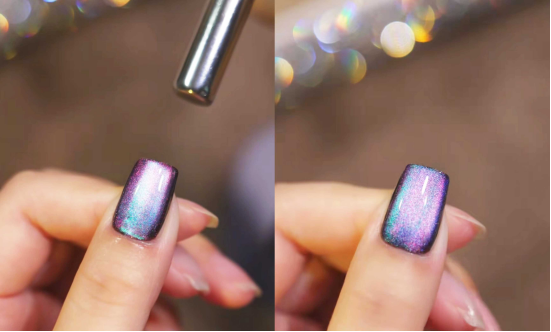
Step 2: Apply a second layer of cat’s eye gel to enhance the layers
Next, apply a coat of purple cat’s eye gel polish (CE-10). Use the magnet to draw out the wide light (repeat the magnetic attraction action similar to the first step to allow the second layer of cat’s eye gloss to overlap with the first layer in terms of color and light and shadow).
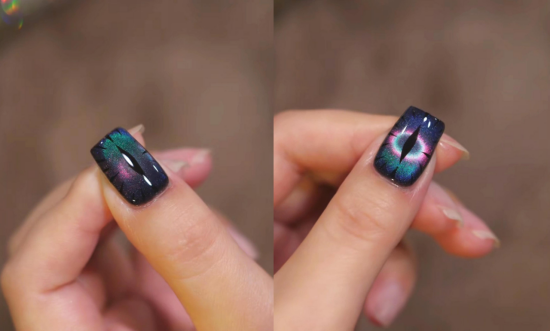
At this point, you can see that the base color of the nail has become richer, and the cat’s eye luster shows a variety of changes from different angles—as the viewing angle changes, bands of iridescent colors such as blue and purple flow, laying the foundation for the subsequent “devil’s eye” design.
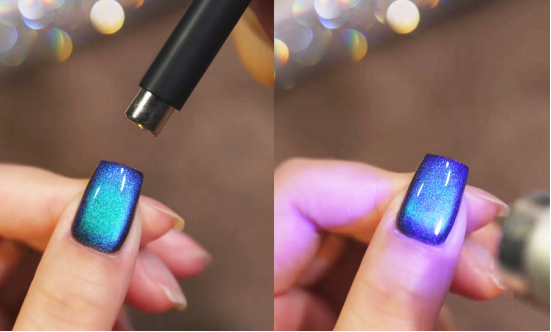
Étape 3 : Créer un double halo magique avec deux aimants
Take two magnets that attract each other and place them close to your nails at a specific angle. Use the magnetic force to guide the magnetic powder in the cat’s eye gel to create a “magical double halo” effect.
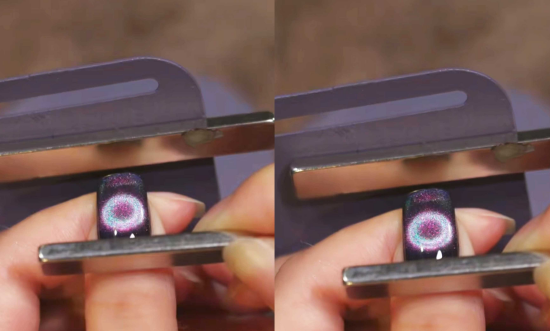
Cette étape crée un effet de couche en forme d'anneau sur la surface de l'ongle, ce qui rehausse instantanément la sophistication et l'élégance de la manucure. Sous la lumière, il brille comme le motif de l'iris à l'extérieur de la pupille.
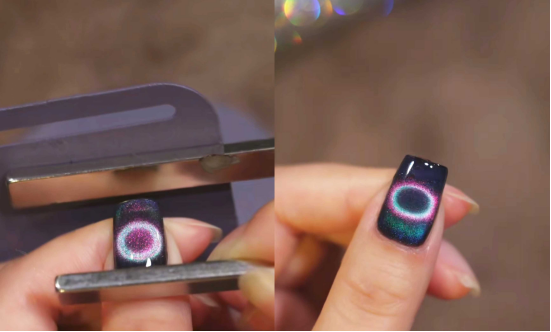
Step 4: Draw the devil’s eye to add a thematic touch
Using black nail art glue and a fine-tipped nail art pen, draw the “Devil’s Eye” design at the center of the nail: first outline the vertical, elongated pupil shape, then gently blend or refine the edges to enhance the eye’s intimidating and mysterious appeal. This step transitions the nail art from a vibrant base color to a story-driven thematic design, infusing the overall style with a cool, edgy vibe.

Finition
Couche finale (appliquer un couche de finition Le vernis à ongles peut être appliqué sur les ongles avec une couche de vernis brillant et durcir sous une lampe UV pour protéger le dessin et la brillance de l'ongle et prolonger sa durée de vie).
And there you have it—the “Evil Eye” nail art is complete! The mysterious cat-eye effect paired with the unique devil eye design makes this nail art a real eye-catcher in everyday life. If you’re interested, why not give this technique a try.
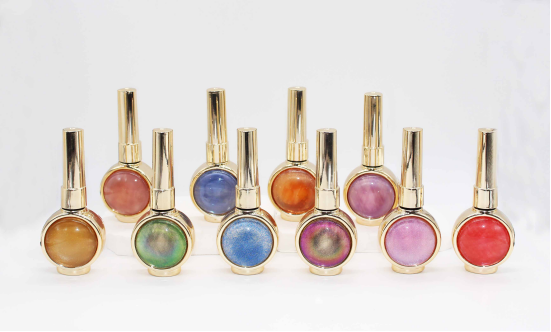
In the tutorial, I used CHROMÉCLAIR’s Gel Polish sans HEMA. Their products are safe and hypoallergenic (HEMA-free & TPO-free), environmentally friendly, and free of irritating and harmful ingredients, protecting the health of your nails. There is a wide range of colors to choose from, keeping up with the latest trends, so you can use them with confidence and look good!
Si vous rencontrez des problèmes au cours du processus, vous pouvez regarder le tutoriel vidéo ci-dessous. Si vous trouvez ce tutoriel utile et que vous l'aimez, n'oubliez pas de lui donner un pouce en l'air, de le sauvegarder et de vous abonner. À la prochaine fois !