
If you want your gel polish to last, you have to cure it the right way. Check out these recommended curing times:
| Lamp Type | Curing Time |
|---|---|
| UV Lamp | 120 seconds |
| LED Lamp | 60 seconds |
| Flash Cure | 15-30 seconds |
LED lamps work faster because they use special wavelengths. When you rush or skip curing, your gel polish chips and peels way sooner. Take your time with each layer. You’ll see a smoother, longer-lasting finish.
💡 Tip: Pay close attention during curing. It’s the secret to a chip-free manicure.
Key Takeaways
- Cure gel polish properly to avoid chips and peeling. Follow recommended times: 30-60 seconds for LED and 120 seconds for UV lamps.
- Use thin layers of polish for better curing. Thick coats can trap moisture and lead to weak, soft polish.
- Check your lamp’s wattage. Higher wattage means faster curing, ensuring your nails stay strong and glossy.
- Always clean and maintain your lamp. A dirty or old lamp can lead to poor curing and nail damage.
- Take your time with each step. Rushing can cause sticky nails and a manicure that doesn’t last.
What Is Curing?
Curing Defined
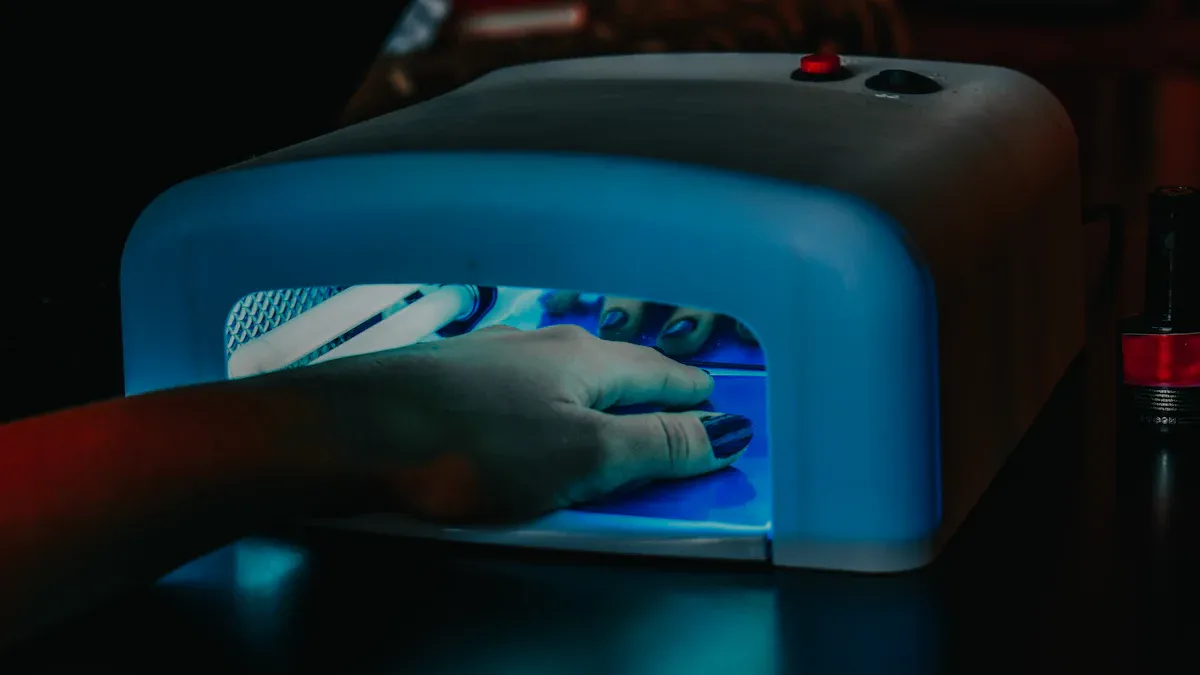
You might wonder what “curing” means in nail care. Curing is when wet gel polish becomes hard and shiny. This happens when you put your nails under a UV or LED lamp. The lamp’s light starts a chemical reaction called polymerization. During this, the polish ingredients join together to make a strong layer.
Here’s how experts explain curing in nail technology:
| Aspect | Description |
|---|---|
| Curing Process | Polymerization reactions start when nails are exposed to UV or LED light. |
| Key Components | Photoinitiators, acrylate monomers, and oligomers help make a tough film. |
| Polymerization Mechanism | Cationic and radical polymerization work, and how well it works depends on the gel and photoinitiators. |
| Composition Development | New formulas use film-forming polymers, pre-polymers, and other things for sticking and looks. |
| Health and Environmental Concerns | Scientists are trying to use natural ingredients instead of petroleum-based acrylates to make gel polish safer for people and the planet. |
When you cure gel polish, a few things happen:
- Gel polish goes through polymerization, where monomers and oligomers join to make a solid.
- Photoinitiators in the polish soak up light, starting a chain reaction that builds a cross-linked network.
- This network makes the polish last longer and bend without breaking.
Why Timing Matters
You may ask, “Why does timing matter?” The answer is easy. If you don’t cure each layer long enough, the polish won’t get hard. Your nails might feel sticky or soft. Your manicure will chip or peel faster.
Curing for the right time lets the chemical reaction finish. You get a strong, shiny finish that stays on. If you hurry or skip steps, you lose the strength and shine that make gel polish great. Always follow the recommended times for each layer. Your nails will look better and last longer!
Gel Polish Curing Times
LED vs UV Lamp Times
You might wonder why there are different lamps for curing gel polish. The answer is simple. LED and UV lamps use different types of light to start the curing process. LED lamps cure gel polish much faster than UV lamps. Most LED lamps set each layer in about 30 to 60 seconds. UV lamps usually need around 120 seconds for the same result.
Here’s a quick look at how lamp wattage affects curing time:
| Wattage | Curing Time |
|---|---|
| 6–24W | Good for touch-ups and stickers. |
| 24–36W | Great for full gel polish sets at home—cures in 30–60 seconds. |
| 48W+ | Professional power for fast, even curing. |
Newer LED lamps use more LED beads and higher wattage. This means you can finish your nails in less time. Some advanced lamps cure each layer in under 30 seconds. That’s a big time saver!
Tip: Always check your lamp’s wattage and follow your gel polish brand’s instructions for best results.
Layer-Specific Curing (Base, Color, Top)
Each layer of gel polish needs its own curing time. You can’t rush this part. If you do, your manicure won’t last.
- Base Coat: This layer helps the color stick. Cure for 30–60 seconds under an LED lamp or 120 seconds under a UV lamp.
- Color Coat: Apply thin, even coats. Cure each coat for 30–60 seconds with LED or 120 seconds with UV.
- Top Coat: This layer seals everything in. Cure for 30–60 seconds with LED or 120 seconds with UV.
If you use a high-wattage lamp, you might finish even faster. But don’t overdo it. Too much heat can cause the polish to wrinkle or crack.
Factors Affecting Curing
Many things can change how well your gel polish cures. Here’s what you need to watch out for:
- Lamp Wattage: Higher wattage means faster curing. Low wattage can leave your nails soft and undercured. Too much power can overcure and damage your nails or skin.
- Lamp Quality: Outdated or broken lamps don’t cure polish well. This leads to chipping, lifting, and even skin irritation or allergies.
- Layer Thickness: Thick layers don’t cure all the way through. The top might look dry, but the bottom stays soft. Always use thin, even coats.
- Polish Brand: Some brands need more or less time. Always check the label.
- Environment: Humidity and temperature matter. High humidity or cool rooms slow down curing. Warm, dry rooms help polish set faster.
Here’s a quick list to help you remember:
- Use thin coats for every layer.
- Make sure your lamp works well and has enough power.
- Follow the instructions for your gel polish brand.
- Keep your workspace dry and at a comfortable temperature.
If you want to see which lamps work best, check out this chart:
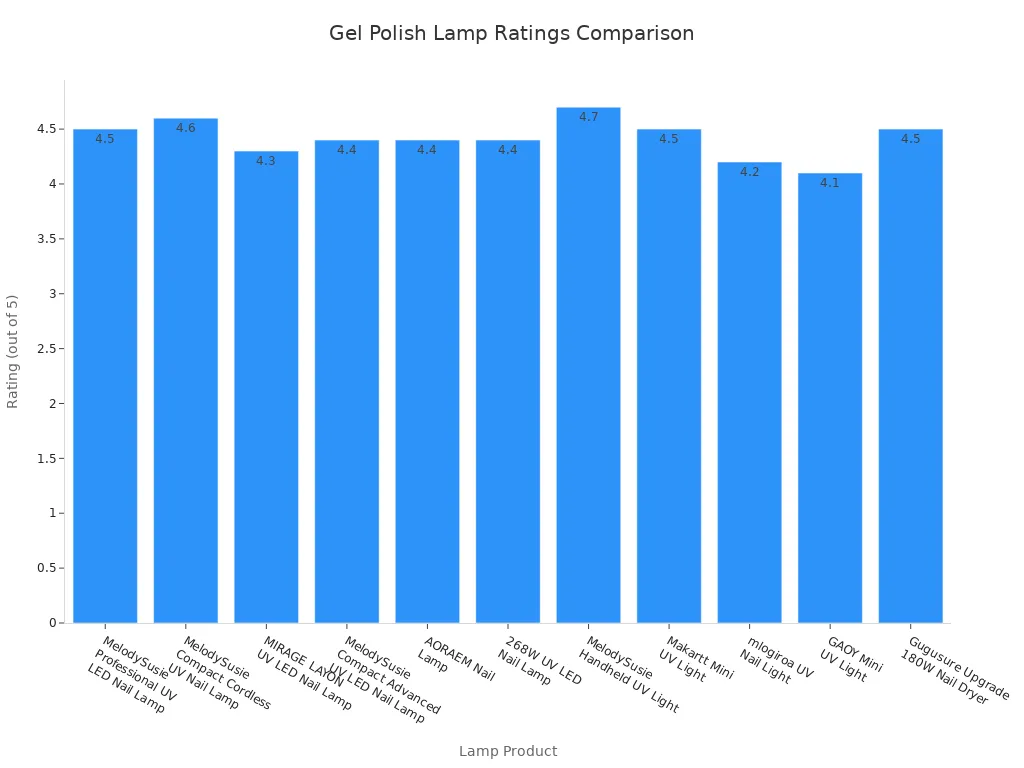
Note: Clean your lamp often and check the bulbs or LEDs. This keeps your curing times accurate and your nails looking great.
When you understand why these factors matter, you can avoid common mistakes. You’ll get a manicure that lasts and looks professional every time.
Effects of Improper Curing
Immediate Issues (Tackiness, Smudging)
When you do not cure your nails the right way, you notice problems right away. Your gel polish might feel sticky or soft. Sometimes, it even smudges if you touch something too soon. You might think this is normal, but it means the polish did not harden all the way.
Here are some common reasons for these issues:
- Thick layers can block the light from your lamp. The polish stays gooey and may even heat up too much.
- Old or dirty products can make the gel thick, sticky, or separated. This stops the polish from curing like it should.
- It is easy to mix up the sticky layer that is supposed to be there with uncured polish. If you wipe your nails and they still feel soft, they need more time under the lamp.
You want your nails to look shiny and smooth. If you rush, you get tacky nails that pick up dust and lint. That is not the look you want!
Long-Term Problems (Chipping, Peeling)
If you do not cure your gel polish all the way, you will see bigger problems after a few days. The polish can start to chip or peel off. Sometimes, it even looks dull instead of shiny.
Here is why this happens:
- Moisture can get trapped under the polish. Your nails expand, and the polish lifts or peels away.
- The top of the polish might look dry, but the bottom can stay soft. This makes the polish weak and easy to chip.
- If you chip a nail, the polish can peel even more. You need to fix chips right away to stop more damage.
- Soft layers do not protect your nails. They can break or crack.
- Uncured chemicals can cause itching, redness, or even allergies.
“We’re seeing it more and more because more people are buying DIY kits, developing an allergy and then going to a salon, and the allergy gets worse.”
“The UV lamps that are purchased to dry the polish do not work with every type of gel. If a lamp is not at least 36 watts or the correct wavelength, the acrylates do not dry properly, penetrating the nail bed and surrounding skin, causing irritation and allergies.”
You want your manicure to last. Proper curing keeps your nails strong, shiny, and safe.
Proper Curing Steps
Step-by-Step Gel Polish Curing
You want your manicure to last, so you need to follow each step carefully. Every part of the process matters because it helps your gel polish stay strong and shiny. Here’s how you can get salon-quality nails at home:
- Clean and trim your nails. Remove any old polish and wash your hands. Dirt and oil can stop the polish from sticking.
- Shape and buff your nails. Use a nail file to shape your nails. Buff the surface lightly. This helps the gel polish grip better.
- Push back your cuticles. Gently push them back with a cuticle stick. This gives you more space for polish and keeps it from lifting.
- Apply a thin base coat. Use a thin layer. Cure under an LED lamp for 30 seconds or a UV lamp for 1 minute.
- Paint thin color coats. Apply one thin coat of color. Cure each coat for 30–60 seconds with LED or 2 minutes with UV. You can add more coats for a brighter look, but keep each layer thin.
- Seal with a top coat. Apply a thin top coat. Cure for 60 seconds with LED or 2–3 minutes with UV.
- Wipe off the sticky layer. Use a cleanser to remove any tacky residue.
- Finish with cuticle oil. Massage a drop of oil into your cuticles to keep them healthy.
💡 Tip: Thin layers cure better and last longer. Thick coats can stay soft underneath and peel off.
Common Mistakes to Avoid
You might wonder why your gel polish chips or peels even when you follow the steps. The answer often lies in small mistakes. Here are some common errors and how you can avoid them:
- Using the wrong lamp. Not all lamps work with every gel polish. Always check if your lamp matches your polish brand.
- Applying thick coats. Thick layers don’t cure all the way. They bubble, chip, and peel faster, especially with dark colors.
- Undercuring. If you don’t cure long enough, the polish stays soft and lifts easily. It’s better to cure a little longer than not enough.
- Bad hand position. If your hand isn’t flat in the lamp, some nails won’t get enough light. Place your hand flat and still.
- Old or weak lamps. Lamps lose power over time. If your lamp is old, it may not cure the polish well. Replace bulbs or upgrade your lamp if needed.
| Mistake | Why It Matters | How to Avoid |
|---|---|---|
| Wrong lamp | Causes under-curing and allergies | Use a lamp made for your gel polish |
| Thick coats | Leads to bubbling, chipping, and peeling | Apply thin, even layers |
| Undercuring | Results in lifting and weak polish | Cure for the full recommended time |
| Bad hand position | Some nails stay soft and uncured | Keep your hand flat in the lamp |
| Old lamp | Weak light means poor curing | Maintain or replace your lamp |
🚫 Don’t rush! Take your time with each step. Your nails will thank you.
How to Check for Full Cure
You want to know if your gel polish is fully cured before you move on. Here’s how you can check:
- Touch test: After curing, gently tap the surface. It should feel hard and smooth. If it’s sticky or soft, cure for another 30 seconds.
- Shine check: Fully cured polish looks shiny and even. Dull spots mean you need more time under the lamp.
- Flex test: Press lightly on the nail edge. The polish should bend a little but not crack or peel.
- Sticky layer: Some gels leave a tacky layer after curing. This is normal. Wipe it off with cleanser. If the polish underneath feels soft, cure again.
🕵️♂️ Pro tip: If you’re unsure, cure for an extra 30 seconds. Over-curing is safer than under-curing.
Professional nail salons always use compatible lamps and keep their equipment in top shape. They apply thin coats and cure one hand at a time to make sure every nail gets enough light. You can do the same at home for perfect results.
When you follow these steps and avoid common mistakes, you give your gel polish the best chance to last. You get strong, shiny nails that stay beautiful for weeks.
You want your gel polish to last and look great. When you follow the right curing times and steps, you get strong, shiny nails that stay chip-free for weeks. Here’s why it matters:
- Your manicure resists chips and stays glossy.
- Proper curing can make your nails last up to three weeks.
- Thin, even layers help the light reach every part of your nail.
- A good lamp and careful prep stop sticky or weak polish.
Stick to these tips and avoid common mistakes. You’ll enjoy salon-quality results at home every time.
FAQ
Why does gel polish stay sticky after curing?
Gel polish feels sticky when you don’t cure it long enough. Sometimes, the lamp isn’t strong enough. You need to cure each layer for the full recommended time. If it’s still sticky, try curing for another 30 seconds.
Why do my gel nails chip so quickly?
Chipping happens when you rush the curing process or use thick coats. Thin layers and proper lamp wattage help your polish last longer. Always follow the curing times for each layer to keep your nails strong.
Why can’t I use regular nail polish with a gel lamp?
Regular nail polish doesn’t have the ingredients that react to UV or LED light. Gel polish needs light to harden. If you use regular polish, it won’t cure or last like gel does.
Why do I need to use thin coats for gel polish?
Thin coats let the light reach every part of your nail. Thick coats stay soft underneath and peel off fast. You get a smoother, longer-lasting finish when you use thin, even layers.
Why is my gel polish wrinkling after curing?
Wrinkling happens when you apply thick coats or over-cure the polish. Your lamp might be too strong. Use thin layers and check your lamp’s wattage to avoid wrinkles.