LED light bulbs work much faster owing to the wavelengths. The moment you run out of time or miss out on the curing stage, the gel polish chips away quite quickly. It is important that you give yourself adequate time for each coat application.
💡 Consejo: Focus on the curing process. It is the key to a flawless manicure.
Summary Points
Cura correctamente el esmalte en gel. para evitar astillas y descascarillado. Siga los tiempos recomendados: 30-60 segundos para LED y 120 segundos para lámparas UV.
Apply thin polish coats for adequate curing. Applying thick coats may trap moisture hence leading to weak, soft polish.
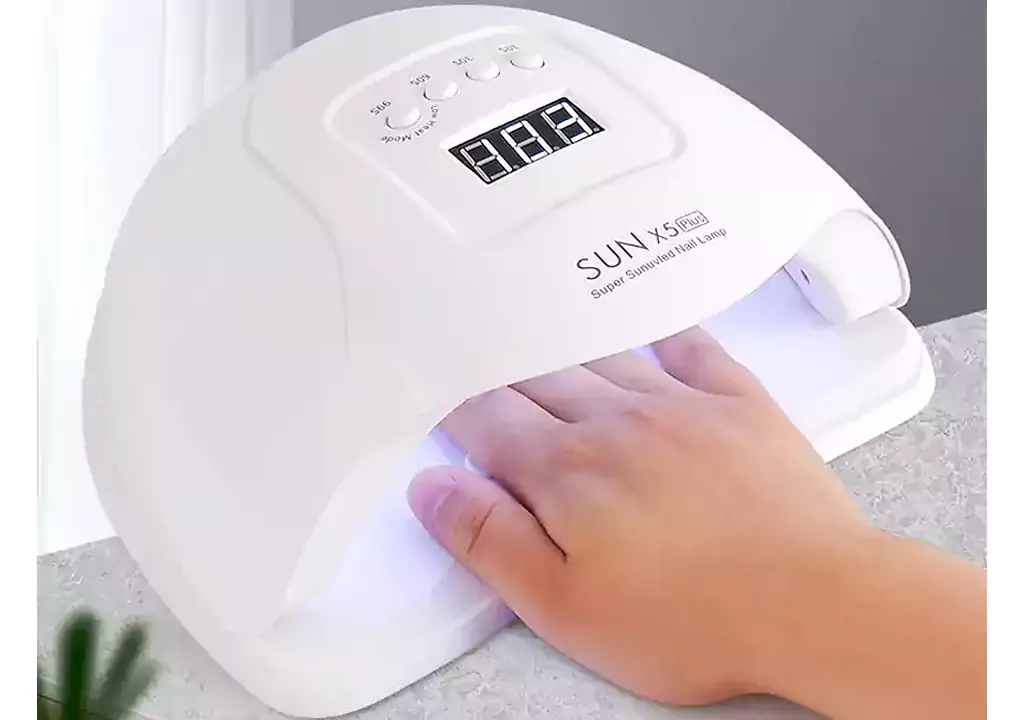
Ensure that you check the wattage of your lamp. The higher the wattage, the faster curing takes place hence guaranteeing strong nails.
Always keep the lamp clean and serviced to avoid any cases of poorly cured nails.
Take time to do everything to ensure a quality outcome.
¿Qué es el curado?
Definición de curado
You may be curious about the term “curing” when it comes to nails. Curing is defined as the drying and hardening process of gel polish that is in its liquid state. To cure it, you need to place your nails under either a UV or LED lamp, which triggers a chemical process known as polymerization.
Así es como los expertos explican el curado en la tecnología de las uñas:
Las reacciones de polimerización comienzan cuando las uñas se exponen a la luz UV o LED.
Componentes clave
Los fotoiniciadores, los monómeros de acrilato y los oligómeros ayudan a crear una película resistente.
Mecanismo de polimerización
La polimerización catiónica y radicalaria funciona, y su eficacia depende del gel y de los fotoiniciadores.
Desarrollo de la composición
Las nuevas fórmulas utilizan polímeros formadores de película, prepolímeros y otros componentes para mejorar la adherencia y el aspecto.
Preocupaciones sanitarias y medioambientales
Los científicos están tratando de utilizar ingredientes naturales en lugar de acrilatos derivados del petróleo para que los esmaltes en gel sean más seguros para las personas y el planeta.
The process of curing gel polish involves several reactions:
There is a polymerization reaction in which the monomers and oligomers combine to form a solid substance.
The photoinitiators present in the polish absorb energy and initiate a reaction chain to create a cross-linked network.
The cross-linked network helps the polish resist degradation and flexing.
Por qué es importante el momento oportuno
A question that arises is “Why is timing important?” It is very simple. When each layer is not cured for a sufficient amount of time, the polish will not dry properly. This would make your nails sticky and not firm. It will chip and peel sooner than expected.
Timing each step is important because this allows the chemical process to happen fully. As a result, you will get a durable and shiny coat of polish that will last for a long time.
Tiempos de secado del esmalte en gel
Tiempos de lámparas LED frente a lámparas UV
The first question that comes to mind when talking about two types of lamps used for curing gel polish is why do we have to use them. It turns out that these lamps have different sources of light that trigger the curing process. An LED lamp cures gel polish significantly faster than a UV lamp.
A continuación, se muestra un resumen rápido de cómo la potencia de la lámpara afecta al tiempo de curado:
Potencia profesional para un curado rápido y uniforme.
The newer types of lamps have a higher number of LED beads and watts. This enables you to do your manicure faster since some lamps take less than 30 seconds to cure each layer.
Consejo: Be sure to know your lamp’s watts. Also, follow the instructions provided by the specific brand of gel polish.
Curado específico por capas (base, color, acabado)
Every gel polish layer must be cured differently. You cannot skip this step. If not done properly, your manicure will not stay.
Capa base: This layer makes the color adhere. Cure it for 30-60 seconds when using an LED lamp or for 120 seconds when using a UV lamp.
Capa de color: Make sure your coats are thin. Cure for 30-60 seconds when using LED lamps or 120 seconds when using a UV lamp.
Capa superior: This is the final coating layer on your manicure. It cures for between 30 and 60 seconds when using LED lamps, and 120 seconds when using UV lamps.
With more wattage lamps, it will be cured quickly. Be careful not to have too much heat because it might destroy the nail polish.
Factors Affecting Cure Times
Hay muchos factores que pueden influir en el secado del esmalte en gel. Esto es lo que debes tener en cuenta:
Wattage of Lamp: More watts lead to fast curing. Insufficient wattage causes the polish to be improperly cured, leaving your nails soft while excessive wattage over-cures your nails.
Quality of Lamp: If you have outdated or defective lamps, your polish will fail to cure well leading to chipping, lifting as well as allergic reactions.
Thickness of Layers: Applying thick coats will prevent proper curing since the layers may not completely harden from within. Apply thin layers.
Brand of Polish: Different brands cure at different rates. Consult instructions on each container before applying.
Environmental Conditions: Temperature and humidity affect the rate at which your polish cures. Increased humidity or cool temperatures hinder curing while warm and dry conditions speed up the process.
Below are some pointers that you might find helpful:
Apply thin layers for all layers.
Ensure that your lamp works properly and is sufficiently powered.
Adhere to the manufacturer’s guidelines.
Your workspace should remain dry and have a comfortable temperature.
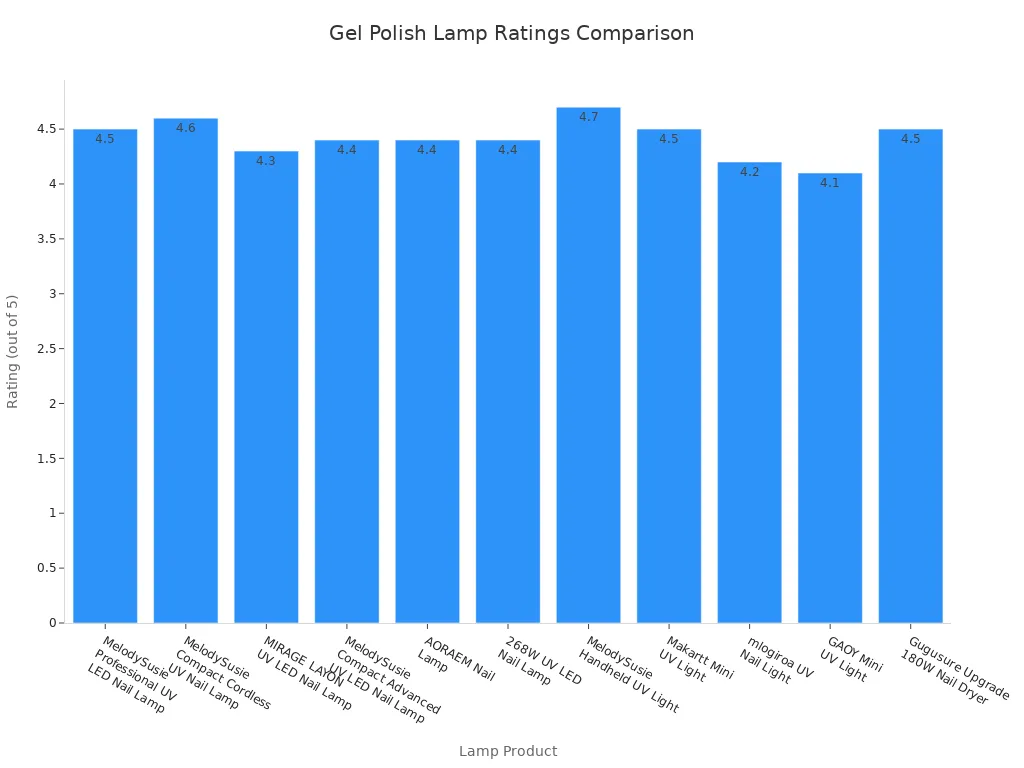
Si quieres saber qué lámparas funcionan mejor, consulta esta tabla:
Nota: Just remember that regular cleaning of your lamp and maintenance of the bulbs or LED light are essential. You will always maintain the right curing times and produce perfect-looking nails each time.
By understanding the significance of these ingredients, you will learn how to avoid these typical mistakes and have your manicures last long.
Efectos de un curado inadecuado
Issues Right Away (Stickiness, Smudging)
In cases where the nails have been cured improperly, you will quickly realize that certain issues have arisen. These include stickiness and softness of your esmalte en gel. In extreme cases, your nails will be smudged when you come into contact with things shortly after applying the polish.
Some of the causes of these problems include:
The thick coats can prevent the light from reaching your lamp. The polish will remain sticky and might get heated excessively.
Stale or contaminated gels can make the gel sticky or separated. Consequently, the polish fails to cure properly.
It can be challenging to differentiate between the sticky layer that should come out during the process and the uncured polish. You need to leave the polish on your nails until the nails become hard after removing your hands from the lamp.
Quieres que tus uñas luzcan brillantes y lisas. Si te apresuras, obtendrás uñas pegajosas que atraen el polvo y las pelusas. ¡Ese no es el aspecto que deseas!
Problemas a largo plazo (astillamiento, descascarillado)
Failure to properly cure your gel polish will make you experience more serious consequences within a couple of days. It may begin chipping and peeling, making the nail dull rather than glossy.
The following is the explanation why it happens:
Firstly, moisture is retained between your nail and the gel polish layer making the polish peel and lift up.
Secondly, while the surface may seem completely cured, its inner layer remains soft, thus leading to fragility and chipping.
Thirdly, should a chip occur, there will be peeling, requiring an immediate action to prevent further damage.
Fourthly, soft layers do not provide protection and can easily chip.
Lastly, uncured chemicals can trigger itching, inflammation, and even allergic reaction.
“This trend is occurring more frequently because an increasing number of individuals are using DIY kits, getting the allergic reaction, and then visiting the beauty salon where the reaction becomes exacerbated.”
“UVA lamps used for curing the nail polish may not be appropriate for every variety of gel. In case the lamp is lower than 36 watts or has incorrect wavelength, then acrylate monomers will remain uncured and get absorbed into the skin causing irritations and allergic reactions.”
You would like your manicure to endure. It is essential to cure it properly so that your nails stay healthy and beautiful.
Pasos adecuados para el curado
Gel Polish Cure Steps
In order for your manicure to retain its structure, you have to be keen enough to follow all the steps. This is necessary so that your nail polish remains in good condition. Here are the steps to ensure you achieve salon-level nails at home:
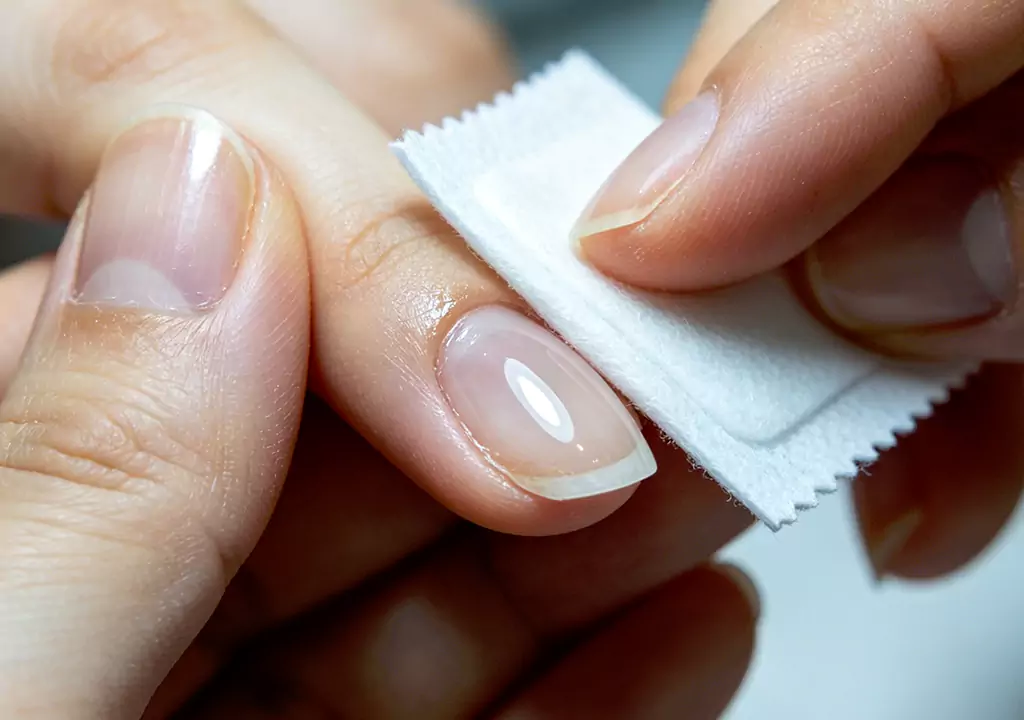
First of all, you need clean manicured nails. All the polish residues need to be removed. The oils and dirt must also be washed off, as they can hinder proper adherence of the polish.
Prepare your nails. Your nails can be shaped with the use of a nail file. Buff your nails slightly to prepare them for the gel polish.
Pull your cuticles back. Gently pull them back using a cuticle stick. You will get enough room for the application of polish.
Apply a thin base coat. Apply a thin layer and cure it under an LED lamp for 30 seconds or a UV lamp for a minute.
Apply thin layers of the color. Apply one thin layer of color. Allow curing time for 30 to 60 seconds using LED or 2 minutes under UV light. You may apply more layers of color for brighter nails, but each layer should be thin.
Use a top coat on your nails. Apply a thin top coat on your nails. Let it cure for 60 seconds with LED or 2 to 3 minutes under UV light.
Clean the sticky layer. Clean up the sticky layer by applying the cleanser.
Apply cuticle oil. Use cuticle oil on your cuticles.
💡 Consejo: Las capas finas se secan mejor y duran más tiempo. Las capas gruesas pueden permanecer blandas por debajo y desprenderse.
Errores comunes que se deben evitar
Quizás te preguntes por qué tu esmalte en gel chips or peels even when you follow the steps. The answer often lies in small mistakes. Here are some common errors and how you can avoid them:
Incorrect choice of the lamp. There is no universal lamp. It means that it is required to ensure that the lamp is suitable for your polish.
Thick layers. It is better to use thin layers rather than thick coats since the latter do not cure properly. As a result, they tend to chip and peel off.
Insufficient curing time. Undercuring leaves the polish layer soft, so it tends to lift quickly. In this situation, the recommended solution is to extend the curing time.
Poor hand position. You have to make sure that your hand is placed correctly in the lamp, otherwise, some of the nails will not receive adequate exposure. Therefore, you have to place your hand in the right manner.
Old or low-power lamp. Such devices become less powerful over time, so their efficiency decreases.. If your lamp is old, it may not cure the polish well. Replace bulbs or upgrade your lamp if needed.
Error
Por qué es importante
Cómo evitar
Lámpara incorrecta
Provoca curación insuficiente y alergias.
Utiliza una lámpara diseñada para tu esmalte en gel.
Abrigos gruesos
Provoca burbujeo, desconchado y descamación.
Aplique capas finas y uniformes.
Curado insuficiente
Provoca levantamiento y pulido débil.
Cure durante todo el tiempo recomendado.
Mala posición de las manos
Algunas uñas permanecen blandas y sin curar.
Mantén la mano plana en la lámpara.
Lámpara antigua
Una luz débil significa un curado deficiente.
Mantenga o sustituya su lámpara.
🚫 ¡No te apresures! Tómate tu tiempo con cada paso. Tus uñas te lo agradecerán.
Cómo comprobar si el curado es completo
To ensure your gel polish is cured completely before proceeding further, you will have to carry out the following checks:
Prueba táctil: After the curing process, tap the polish surface. This will help you determine whether it is hard or soft.
Shine test: Once cured properly, the polish will look shiny and smooth. You can identify dull sections and conclude that more curing time is required.
Prueba de flexibilidad: Gently push on the nail’s edge to test the flexibility of the polish. This will help you understand if it will crack or peel off easily.
Capa adhesiva: It is common for gels to remain tacky after curing. Use a cleanser to wipe off any sticky residue from the polish surface.
🕵️♂️ Consejo profesional: si no estás seguro, cura durante 30 segundos más. Es mejor curar de más que curar de menos.
Always ensure that compatible lamps are used at all times and that they are in excellent condition. In addition, thin layers are applied and each hand is cured separately to ensure that each nail is properly exposed to the UV light. The following is the process.
If carried out correctly without making any errors, your manicure will definitely stay pretty for quite some time.
To make sure that your manicure stays beautiful, it is essential to ensure that it will last. With the correct curing periods and techniques, you will definitely end up with strong and glossy nails that stay unchipped for weeks. This is due to the fact that:
Your nails will not chip easily nor will they lose their shine.
Correct curing enables your nails to last up to three weeks.
Thinness and uniformity allows proper penetration of the light throughout your nails.
Good lamps and preparation prevent sticky or weak nail polish.
Sigue estos consejos y evita los errores más comunes. Disfrutarás de resultados profesionales en casa cada vez que lo hagas.
PREGUNTAS FRECUENTES
Why does gel polish stay sticky even after being cured?
The problem of sticky gel polish is caused by insufficient curing. Also, sometimes the lamp may not be powerful enough. In case there are sticking issues, you should cure the polish for 30 more seconds.
Why do my gel nails break?
Frequent chipping is usually due to too fast curing and using very thick gel polish coatings. To avoid such a problem, you need to apply thin layers of polish and use the appropriate lamp power.
Can I use regular nail polish with the gel lamp?
You shouldn’t mix regular gel polish with a gel lamp since it does not contain any curing agents required for reacting to UV or LED light.
Why should I use thin coats on my gel polish?
When using thin coats, the light penetrates through every portion of the nails. Thick coats are still soft at the base and flake off quickly. Applying thin, smooth layers will give you better results.
Why does my gel polish have wrinkles?
The reason you see wrinkles is because you used either thick layers or over-cured your polish. Your lamp may also produce too much power. Apply thin layers and ensure that the wattage is right.
Deja una respuesta
Lo siento, debes estar conectado para publicar un comentario.

 English
  Spanish
  German
  French
  Italian
  Dutch
Dutch