Want a dreamy and unique manicure? Today, I’ll teach you how to create a stunning “Colorful Butterfly” manicure. Follow the steps and you’ll easily achieve the same look!
Paso 1: Aplicar un capa base
First, take out black gel polish (I’m using my go-to, CHROMÉCLAIR’s Esmalte en gel sin HEMA productos nº 03; el color es transparente, fluye con facilidad y no es tóxico ni perjudicial para la salud) y aplique una capa uniforme sobre las uñas. Este paso permite que los colores y efectos posteriores aparezcan mejor, proporcionando una base sólida para toda la manicura.
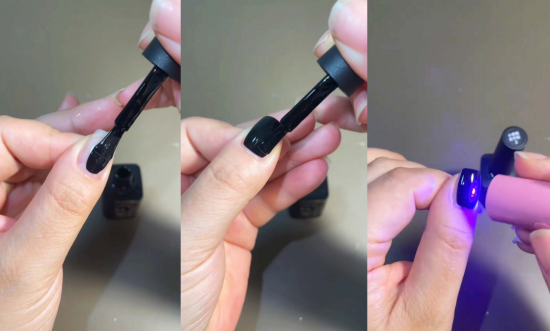
Step 2: Layer Cat’s Eye Gel Polish
Next, choose a white or silver cat’s eye gel polish (I used CHROMÉCLAIR’s Esmalte en gel sin HEMA products No. 437) and apply a layer over the black base. Once this layer is dry, use a cat’s eye magnet to remove the shine. This will allow you to create the texture later.
Recommended next step
Build the Nail Art Look Kit
Tutorial looks need more than a color bottle. Choose the color, art detail, transfer or sticker step, and a top coat as one look kit.
- Choose the main color or set.
- Add the art detail: sticker, transfer gel, magnet, or brush.
- Seal the finished look with top coat.

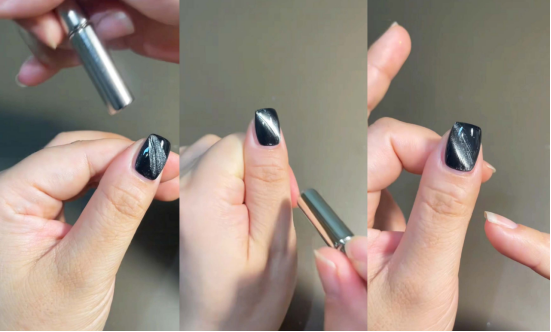
Paso 3: Dibujar líneas con un tiralíneas
Take out a line drawing pen and, starting at the corner of your nail, draw lines in the desired direction. Don’t aim for perfectly regular lines; just draw a variety of long and short lines to create a natural, sunlight-like effect on your nails.

Paso 4: Light Draw y Shape (sin iluminación)
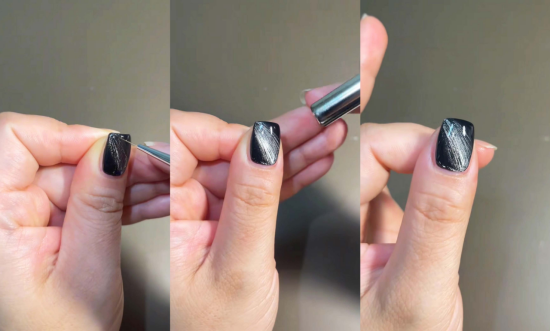
Utiliza un imán para pegar la luz cat-eye en el centro de la uña. Importante: No utilices iluminación para este paso.
A continuación, aplica otra capa de esmalte de gel y repite el proceso de cubrir la luz hacia el centro. Esto hará que la manicura tenga más capas, como si la luz y la sombra fluyeran sobre las uñas.
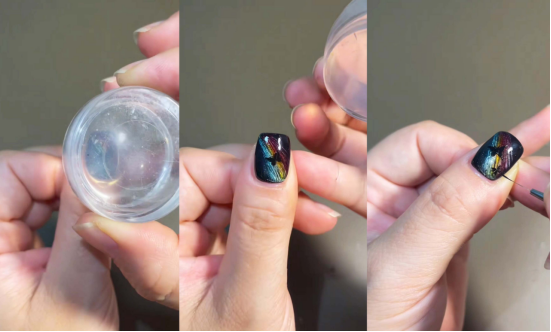
Paso 5: Cola translúcida en capas + refuerzo
Una vez endurecidos bajo la lámpara, selecciona varios pegamentos transparentes y aplícalos uno a uno sobre tus uñas para crear un color más rico y diverso.

A continuación, aplica una capa de pegamento de refuerzo para envolver el efecto nail art anterior, que no sólo protege el nail art sino que también hace que el aspecto general sea más texturizado.

Step 6: Butterfly Stamping & Seal
Utiliza una herramienta para estampar mariposas y estampa un estampado de mariposas en la zona deseada de la uña (para obtener instrucciones detalladas sobre cómo utilizar el estampado, consulta mi tutorial de manicura con estampado de cuadros escoceses). También puedes añadir una pequeña mariposa para añadir más detalle.
Aplica una capa de sellado en todas las uñas y hazlas brillar bajo una lámpara para que la manicura sea más duradera y tenga más brillo.

Follow these steps and you’ll have a gorgeous and exquisite “Colorful Light Butterfly” manicure! The colorful light effect paired with the lively butterflies is super eye-catching whether you’re out and about or for a special occasion. Give it a try!
Para más tutoriales de arte de uñas por favor suscribirse a mí:
https://www.youtube.com/channel/UCI0m-W9pTdU_YvTQLbOLb4Q

Finally, we recommend CHROMÉCLAIR’s Esmalte en gel sin HEMA products: they focus on safety, are low-irritation, environmentally friendly, do not contain harmful ingredients, reduce the risk of allergies (do not contain HEMA & TPO), have a variety of colors, cater to mainstream aesthetics, are designed specifically for users with sensitive skin, care for healthy nails, and ensure that every consumer’s experience is safe and secure.