If you are trying to figure out how long should a gel polish be cured, then you need not worry because this is one of the reasons why the gel polish comes off or chippies earlier than required. The answer to how long should a gel polish be cured lies in your knowledge on how long should a gel polish be cured to get perfect looking nails. Here is how long should a gel polish be cured:
| Tipo de abrigo | Tiempo de curado LED | Tiempo de curado UV |
|---|---|---|
| Capa base | 45 segundos | 90 segundos |
| Capa de color | 60 segundos | 2 minutos |
| Capa superior | 60-90 segundos | 2 minutos |
As long as you follow all these tips on how long to cure gel polish, there won’t be any chipping or dulling of your nails. If you don’t do things correctly and just guess how long to cure gel polish, it can cause some issues. You need to know how long to cure gel polish for professionally looking nails.
Principales conclusiones
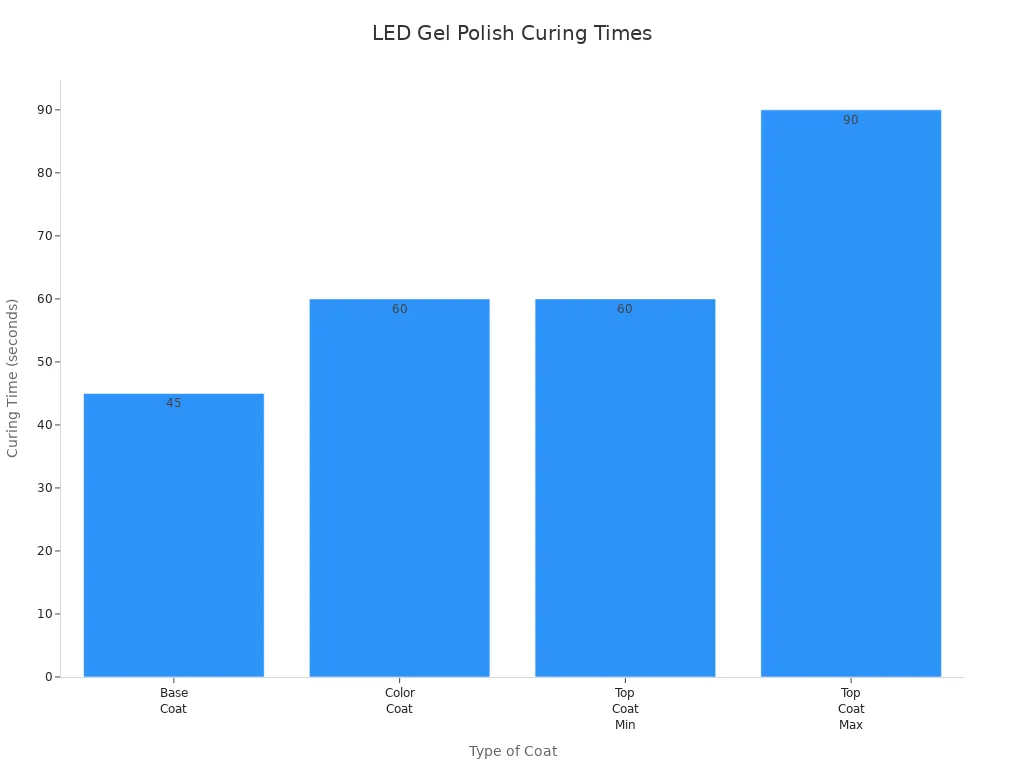
- Ensure that each coat is cured properly and in accordance with the advised time period to prevent any issues such as chipping and peeling off. Use 45 seconds for curing base coat and 60 seconds for curing color coat under LED lamps.
- Remember to use thin layers while applying gel polish. It takes more time to cure thick layers of gel polish, and this causes lifting and wrinkling.
- Make sure to set a timer for every curing process. This allows you to maintain the drying time accurately, ensuring a long-lasting manicure.
- Know what lamp you are using. LEDs dry gel polish much faster than UV lights, which you should keep in mind when curing your manicure.
- Take note of whether your nails have dried correctly. They will be smooth, solid, shiny, and free of air bubbles.
Cuánto tiempo se tarda en secar el esmalte en gel bajo lámparas LED y UV
Curing Times for Base Gel, Color, and Top Gel Coats
If you wish to have a durable gel manicure, the most important aspect would be to understand the curing times for each coat of gel polish. For the base gel, color gel, and top gel coats, there is required curing time that cannot be overlooked.
Aquí tienes una tabla rápida para ayudarte a recordar los mejores tiempos de curado:
| Tipo de abrigo | Tiempo de curado LED | Tiempo de curado UV |
|---|---|---|
| Capa base | 45 segundos | 90 segundos |
| Capa de color | 60 segundos/capa | 2 minutos por capa |
| Capa superior | 60-90 segundos | 2 minutos |
Debes seguir estos tiempos para cada capa. Si te saltas o acortas el proceso, el esmalte podría quedar pegajoso o desprenderse demasiado pronto. Si sigues los tiempos correctos, conseguirás unas uñas brillantes y duraderas.
Recommended next step
Smooth, Long-Lasting Gel Routine
Bubbling, peeling, shrinkage, and dull wear are usually system problems. Build the manicure with prep, base, color, and top coat together.
- Prep the nail plate before color.
- Use a base coat that matches the gel system.
- Finish with a compatible top coat for wear and shine.
Shop long-lasting routine kitSee no-wipe top coatCompare all routines
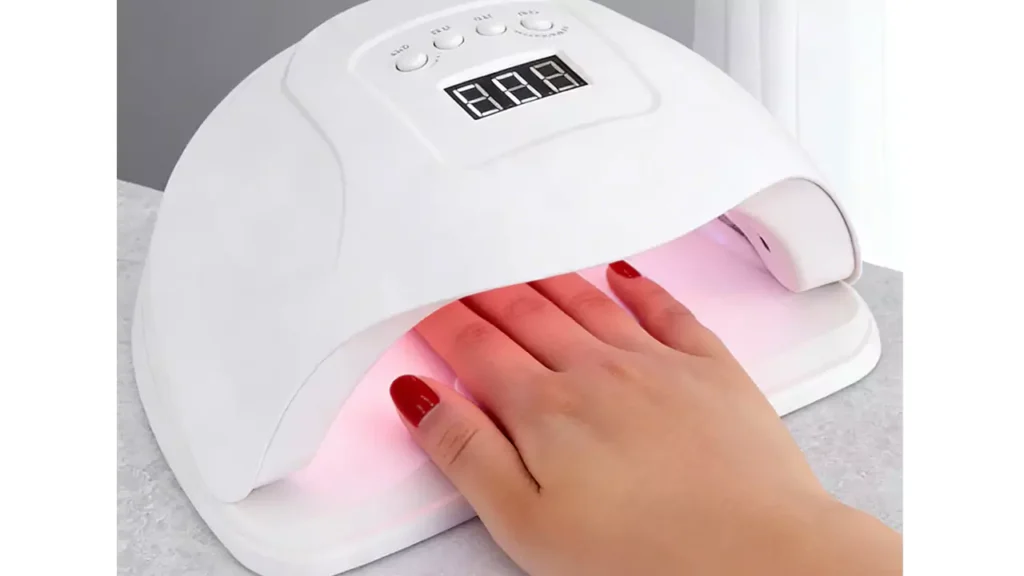
Diferencias entre las lámparas LED y las lámparas UV
It is natural for you to ask what significance this lamp holds. Both LED and UV lamps cure gel polish. However, the process of curing is quite different with both types of lamps. An LED lamp uses a limited spectrum, while a UV lamp uses a wide spectrum.
He aquí una comparación sencilla:
| Tipo de lámpara | Tiempo de curado | Rango de longitud de onda |
|---|---|---|
| Lámpara UV | Más lento | 320 a 400 nm |
| Lámpara LED | Más rápido | 370 a 380 nm |
With an LED lamp, you will complete your manicure faster. If you have to cure your nails using a uv light, then you should allow more time for every coat. Depending on the lamp used, the curing time varies; hence, one should check the lamp being used before applying any product.
Por qué son importantes los tiempos de secado exactos
Maybe you feel like a few seconds don’t matter, but they do. That is why you must stick to the exact curing times for each layer and lamp:
Curing correctly prevents you from having tacky or sticky nails.
Each layer takes its unique amount of time due to differences in viscosity, formula, and light sources.
Insufficient curing can lead to lifting and chipping of your nail polish.
Excessive curing results in the polish becoming very hard and causes it to not stay on your nail anymore.
Inconsistency with the proper schedule can result in larger complications. It may lead to chipping, peeling, and discoloration. Skin irritation and allergies are common if the polish is not dried properly. Dusting due to poorly cured nails can lead to inflammation and even the loss of your nail.
TIP: Set a timer for each coat. This will help you keep track of how long you need to cure the gel polish and give you perfect-looking nails.
If you do everything correctly, you’ll have beautiful, durable nails. You’ll be free from all kinds of issues like chipping and peeling. This is why understanding how long to cure gel polish is so important.
¿Por qué el tiempo de secado afecta a la duración del esmalte de uñas en gel?
Durabilidad y brillo
You will want your gel nails to appear shiny and remain that way for many weeks. This is possible only when you cure each layer of the gel nails for the correct curing time period. What importance does this have? The curing process fixes the color of the nail and gives strength to the nail. When it is done incorrectly, you will face some issues.
- Un tiempo de curado adecuado solidifica el gel y fija el color, lo que da como resultado un acabado duradero y brillante que resiste el desgaste diario.
- Un curado insuficiente puede provocar descascarillado o astillado, mientras que un curado excesivo puede causar fragilidad o decoloración.
- Un acabado brillante tras el secado indica que el esmalte en gel está completamente seco, mientras que una superficie mate significa que necesitas más tiempo bajo la lámpara.
A proper curing process initiates a reaction known as polymerization that results in the hardening of the polish. If the process is not done right and the timings are not accurately gauged, there is a possibility that the polish will peel off or appear dull.
Salud y seguridad de las uñas
However, when getting your nails done, you may never think about their well-being. Scientific evidence proves that prolonged exposure to UV lights can be detrimental to both nails and skin. For example, a relatively safe period of time would be four minutes. Longer periods of UV light can lead to cellular damage and even increase the risk of developing skin cancer.
In case your nail polish is not cured well, there may be uncured chemicals left behind that can come into contact with your skin, causing allergies. This will cause some to experience symptoms such as itching and redness. Others might end up losing their nail plates because of weakened nails. Such problems can be avoided by curing your nail polish adequately.
Prevención del desconchado y el desprendimiento
Your manicure should be lasting; therefore, avoid chips and peels within a few days. The only secret to having this is the curing process. When thick coats are used, when curing time is short, and when one does not cap the free edge, the chances of the polish lifting up or chipping are increased.
Chipping and peeling could also result from thick coats, inadequate curing, and failure to cap the free edge during the application of the gel polish.
When one takes time curing his or her gel polish properly, the outcome will be perfect nails.
Riesgos de un curado incorrecto: curado insuficiente o excesivo del esmalte de uñas en gel.
Señales de esmalte en gel sin secar completamente
Your nails may seem perfectly cured right after curing, but not properly curing your nail polish means you will have obvious signs soon after. Not leaving your gel long enough to cure can make you regret spending time doing your nails.
- There will be wrinkling on top of the cured polish.
- You may spot bubbles underneath the cured polish.
- Your nails will feel bumpy due to too much gel polish.
If you notice any of these problems, then your gel polish hasn’t cured completely, and you will have to correct this problem before applying further layers.
Consejo profesional: Make sure that you apply thin layers and cure them for the prescribed time period. That will help you avoid these common problems.
Problemas derivados del curado excesivo
You may assume that having your nails exposed to the light for slightly more time will be okay. Well, it won’t. Excessive curing will be just as bad as insufficient curing. These are some things that could happen when you over-cure your nails:
- They will become too dry and fragile.
- The gel polish will begin to peel off the nail plate.
- The color of the polish will fade or turn out unevenly applied.
What happens is that by over-curing, the gel becomes too rigid. It is unable to stay flexible and attach to your nail properly. If you want the manicure to remain on for longer, you should make sure you are not over-curing your nails.
Impacto en la longevidad de las uñas
Un secado incorrecto no solo estropea el aspecto inmediato de tus uñas, sino que también afecta a la duración de la manicura. Si no secas el esmalte en gel de la forma adecuada, notarás problemas antes de lo que crees.
- Las capas poco curadas permanecen blandas e inestables. Se desprenden rápidamente.
- Las capas gruesas impiden que la luz llegue a todas las capas. Esto deja un punto blando junto a la uña.
- Si no se respeta el tiempo de secado adecuado, la manicura quedará débil y no durará tanto tiempo.
Si quieres unas uñas fuertes, bonitas y duraderas, debes secar bien el esmalte en gel. Seguir los tiempos adecuados mantiene tu manicura con un aspecto impecable y te ayuda a evitar que se descascarille, se descame y otros problemas.
Factores que influyen en el tiempo de secado del esmalte de uñas en gel
It is possible that you may ask yourself why your gel manicure either dries quickly or takes ages to dry. Here are some considerations which determine this. For you to be able to understand how long it takes for gel nail polish to dry, there are a number of issues you need to consider.
Potencia y tipo de lámpara
The drying time varies depending on your lamp. There are lamps available in various wattages, which have an effect on the drying time of gel nail polish. Those with low wattage will be slow and may fail to provide proper curing, leaving the nails soft. The high wattage ones are fast, although they may heat up when rushed.
| Nivel de potencia | Tiempo de curado | Posibles problemas |
|---|---|---|
| Bajo | Longer (UV: ~2 min, LED: >30 sec) | Uñas poco curadas, blandas y frágiles. |
| Alta | Más rápido | Picos de calor, curado desigual, riesgo de daños. |
The right lamp would be one which has the entire range of wavelengths from 365 to 405 nm. This will allow curing of all types of gel in an effective manner. The best lamps for home use are those ranging from 24 to 36W. There are mini lamps for travel, medium size for one-hand operation, and large lamps for two hands.
Fórmula en gel y color
The composition and coloring of the polish you use also affect the drying process. Certain gels require additional curing due to their high level of energy consumption, which may vary according to the mixing of different gel brands. Variations in the curing process may result in some nails becoming harder than others. Gel with dark color or pigments requires more time for curing or an enhanced intensity of light to do so effectively.
- Lamps should have sufficient wattage depending on your gel polish.
- Always use one brand of gel polishes including the base coat, top coat, and color.
- Dark colored gels require a bit more time.
- Always apply a thin coat of the gel.
Espesor de la aplicación
The application process is equally important as the lamp and the polish. Thick applications mean it will take longer to dry, causing it to chip or peel. Thin applications mean quicker drying time and smoother application. When thick applications are used, you run the risk of having wrinkled nails. To avoid wrinkling and peeling, apply a thin layer, leaving space from your cuticle area.
- Thin layers are essential for proper curing.
- Thick layers require more time and may lead to issues.
- It is important to allow every layer to dry completely before applying another one.
Considering all these points, you will understand precisely how much time it takes for gel nail polish to dry. This way, you’ll achieve better results.
Cómo garantizar tiempos de secado exactos para el esmalte de uñas en gel
Consejos para un curado adecuado en casa
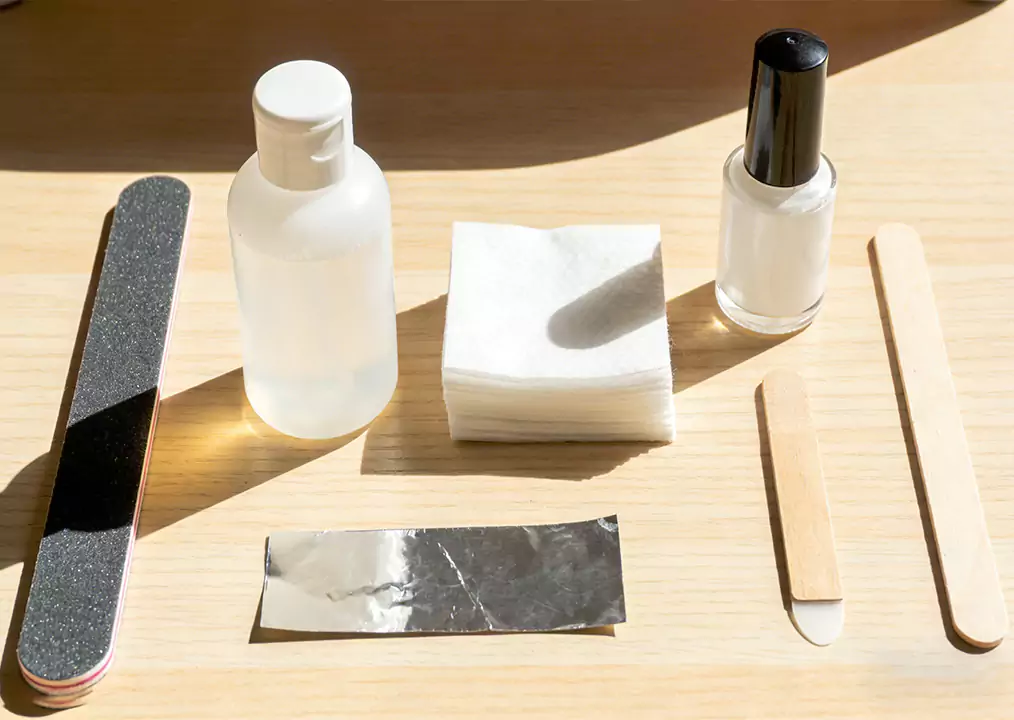
The first thing that you should do is to follow the correct procedure in order to achieve perfection with regard to your nails. It is important that you take care in order to ensure that your gel manicure stays in good condition for long. So why is all of this important? Here is how you can succeed:
- Before you begin, clean and file your nails.
- Buff your nails and get rid of the shine.
- Push your cuticles back to ensure that the gel coats just your nails.
- Wipe your nails using alcohol to remove the oils present.
- Put an even and thin layer of gel base coat on your nails. Thick layers cure slower and might have difficulties.
- Cover up the free edge of your nails with each coat. This is to prevent the polish from lifting.
- Cure your nails under the lamp for the specified period of time. Do not estimate the time; set a timer instead.
- Remove any gel that is on your skin before curing the layers.
Consejo: Sigue siempre las instrucciones de tu lámpara y esmalte. Esto te ayudará a respetar los tiempos de secado exactos y evitar errores.
Cómo comprobar si el gel está completamente curado
Quieres saber si tu esmalte en gel está listo. Así es como puedes saberlo:
- La superficie es suave y dura al tacto, no pegajosa ni viscosa.
- El color se ve brillante y uniforme.
- No hay burbujas, arrugas ni puntos blandos.
- El esmalte no se mueve ni se abolla cuando se golpea suavemente.
Si observa que falta alguno de estos signos, es posible que necesite más tiempo de curado. Es mejor comprobarlo después de cada capa que corregir los errores más tarde.
Tabla de referencia rápida para tiempos de curado
No es necesario que adivines cuánto tiempo hay que secar cada capa. Utiliza esta tabla para recordar los mejores tiempos de secado para tu esmalte de uñas en gel:
| Tipo de abrigo | Tiempo de la lámpara LED | Tiempo de exposición a la lámpara UV |
|---|---|---|
| Capa base de esmalte en gel | 45 segundos | 90 segundos |
| Esmalte en gel Color Coat | 60 segundos | 2 minutos |
| Capa superior de esmalte en gel | 60-90 segundos | 2 minutos |
¿Por qué utilizar una tabla? Te ayuda a evitar errores comunes como un curado insuficiente o excesivo. Si sigues estos tiempos de secado, obtendrás unas uñas fuertes, brillantes y duraderas.
You definitely want the longevity and beauty of your manicure. This is why you must adhere to the correct curing times for normal gel nail polish. Why? Because:
- Correct curing gives you an enduring, chiplees finish.
- Not adhering to proper steps will give you peeling or chipped nails, or worse, an allergic reaction.
- Over curing your regular gel nail polish will make it fragile and difficult to take off.
- The proper timing is key to the correct photochemical process.
Always make sure to read your lamps and gel nail polish directions. By curing your layers correctly, you can ensure that not only are you safe, but you also look great. You can have professional-grade nails without even going to the salon!
PREGUNTAS FRECUENTES
¿Por qué es necesario secar cada capa de esmalte de uñas en gel durante un número determinado de minutos?
Debes curar cada capa durante el número adecuado de minutos, ya que esto fija el color y la resistencia. Si te apresuras, el esmalte de uñas en gel Se mantiene suave. Si esperas demasiado, se vuelve quebradizo. Los minutos adecuados hacen que tu manicura dure.
¿Por qué no puedes simplemente dejar secar el esmalte de uñas en gel unos minutos más para mayor seguridad?
Podrías pensar que más minutos significan mejores resultados. Eso no es cierto. Si curas durante minutos adicionales, el esmalte de uñas en gel puede agrietarse o pelarse. La fórmula funciona mejor cuando sigues los minutos recomendados para cada capa.
¿Por qué el tipo de lámpara cambia el número de minutos que se tarda en secar el esmalte de uñas en gel?
Las diferentes lámparas utilizan diferentes tipos de luz. Las lámparas LED curan más rápido, por lo que se necesitan menos minutos. Las lámparas UV tardan más minutos en curar cada capa. Comprueba siempre tu lámpara y sigue los minutos adecuados para obtener los mejores resultados.
¿Por qué curar durante muy pocos minutos causa problemas con el esmalte de uñas en gel?
Si lo curas durante muy pocos minutos, el esmalte de uñas en gel permanecerá pegajoso o blando. Esto hará que se descascarille o se desprenda rápidamente. Debes curarlo durante todos los minutos necesarios para que tus uñas permanezcan fuertes y brillantes.