Potreste chiedervi per quanto tempo è necessario polimerizzare lo smalto gel per ottenere una finitura forte e lucida. La risposta dipende dalla lampada e dallo strato applicato. Scoprite i tempi di polimerizzazione tipici:
With proper curing, one will obtain a manicure that does not peel off or chip easily. Rushing and applying thick gel layers may cause nail issues to occur sooner than expected.
Key Points to Remember
Remember to cure your manicure using an LED lamp for 30 to 60 seconds or UV lamp for two to four minutes.
It is always important to apply thin layers of gel polish as this helps achieve a quicker curing process without any issues of peeling and chipping.
Think of considering the wattage of your lamp; at least 36 watts is preferred as it will ensure proper curing of your nails.
You should note any signs of full curing by looking out for hard and shiny polish with no sticky patches.
Take note of recommended curing times for every layer of your gel polish.
Tempi di polimerizzazione dello smalto gel
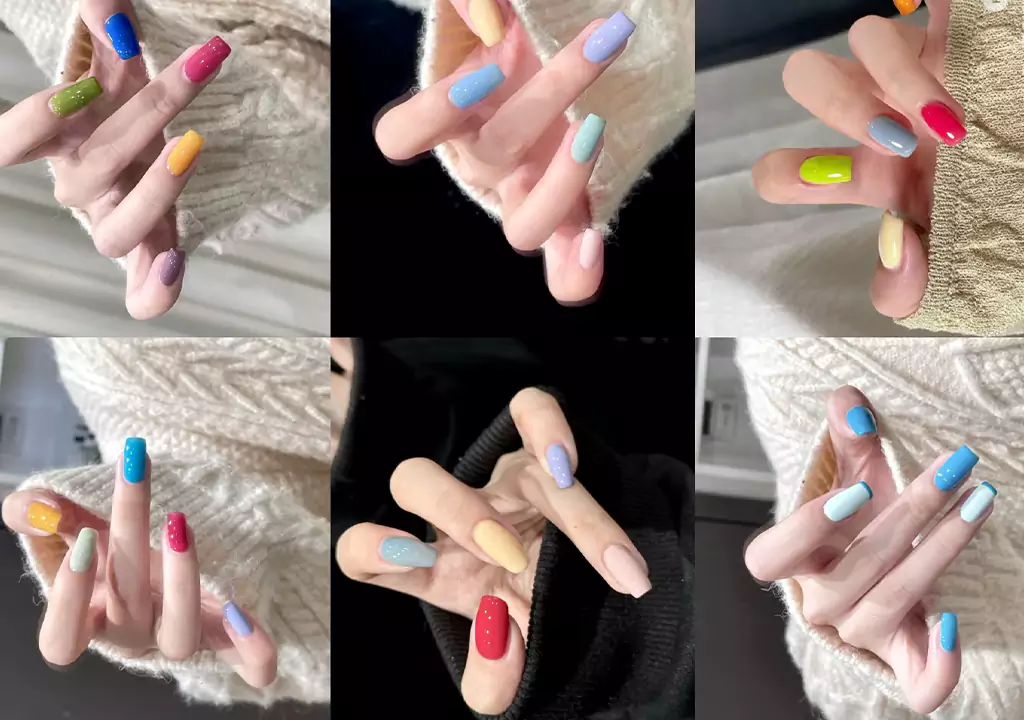
A good gel polish manicure is one that will last for weeks. To achieve this, you need to know how to cure gel polish correctly. This depends on the lamp used, type of gel, and method of applying each coat. We will discuss the reasons behind this below.
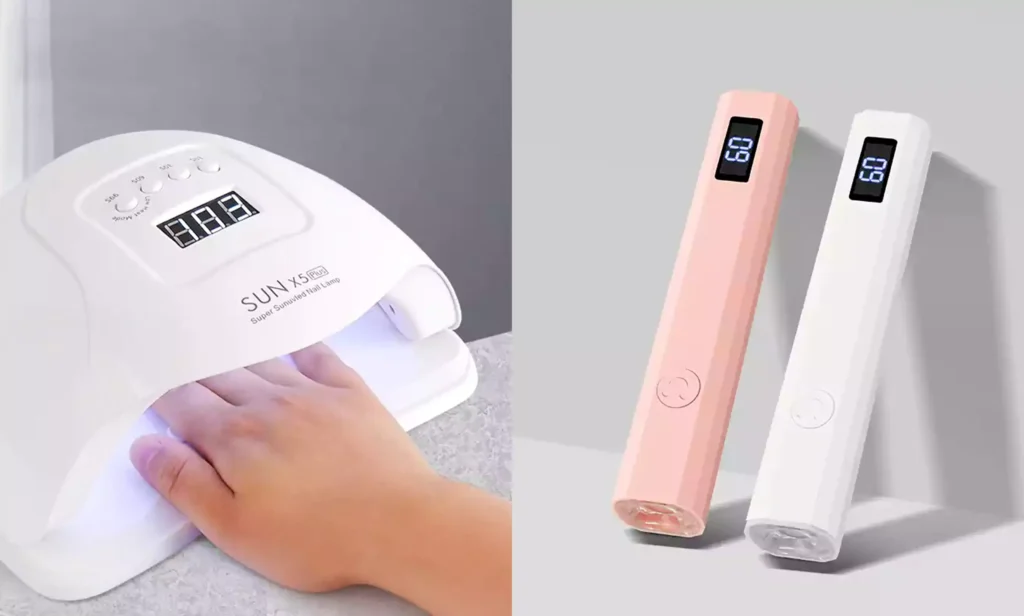
Temporizzazione della lampada a LED
LED lights have revolutionized the way you can dry gel polish. Through the use of sophisticated technology, these dryers make your work easy and fast, and thus, they are highly favored by many individuals who are extremely busy. According to most of the popular brands, you should cure each coat in around 30 seconds using an LED light. However, some salon dryers take just 20 seconds.
LED lights usually take about 30 seconds to dry gel polish per layer.
Modern LED light will give you a quick touch-dry effect within 30 to 60 seconds.
Since you will be done quickly, you will have ample time for nail maintenance.
Suggerimento: Make sure that you check the wattage of your LED light. Using a light with a wattage of at least 36 gives you perfect results for curing the polish. Otherwise, your nails will be easily broken or chipped.
Recommended next step
Smooth, Long-Lasting Gel Routine
Bubbling, peeling, shrinkage, and dull wear are usually system problems. Build the manicure with prep, base, color, and top coat together.
Prep the nail plate before color.
Use a base coat that matches the gel system.
Finish with a compatible top coat for wear and shine.
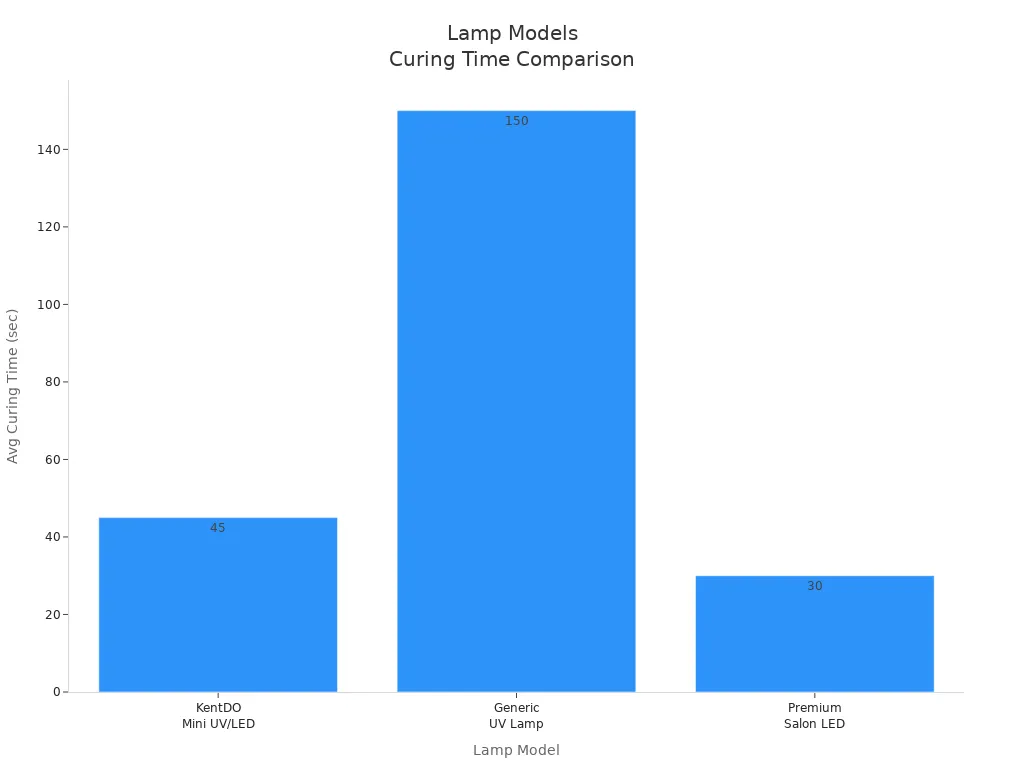
Ecco un rapido sguardo al confronto tra i diversi modelli di lampade:
Modello
Tempo di indurimento
Tipo di luce
Portabilità
Fascia di prezzo
Mini essiccatore UV/LED KentDO
30-60 secondi
Doppio LED/UV
✅
$$
Lampada UV generica
2-3 min
Solo UV
❌
$
Lampada LED Premium per salone
20-40 secondi
Solo LED
❌
$$$
Temporizzazione della lampada UV
UV lamps are older technology and operate a little slower than LED lamps. Most products recommend that each coat be cured for 2-3 minutes under the UV light. The reason for this is because UV bulbs are not as powerful as LED lights and require longer curing times for activation of the chemical compound in gel nail polish.
Gel polish usually takes between 2-3 minutes under a UV lamp to cure.
UV lamps usually take 2-3 minutes to cure gel polish layers.
However, when using a UV light, it may take you longer to manicure than you would have otherwise done, but the manicure is likely to turn out good. Bear in mind that the strength of the light used is important. The lower the strength, the slower the curing process.
Curing Time For Each Layer (Base, Color, Top)
Every layer of the nail polish gel has a distinct curing time since each layer differs from one another with regard to its composition and thickness. The following is a chart of the curing times for each layer:
Tipo di rivestimento
Tempo di polimerizzazione LED
Tempo di polimerizzazione UV
Base
45 secondi
90 secondi
Rivestimento colorato
60 secondi/strato
2 minuti/strato
Top Coat
60-90 secondi
2 minuti
For optimal performance, use thin coatings. It takes longer for thick coatings to cure, and they may peel off or chip. Thin coatings cure quickly, leaving you with a good finish. Make sure that each coat dries before applying another one.
Nota: In case you are having a full manicure session, you will require about 3-4 minutes of time to cure under an LED lamp and 6-8 minutes under a UV lamp. It will include your base coat, two coats of color gel and the last coat of top coat.
With the latest advancements in the field of curing, this process is now much quicker. You can easily cure your gel polish under modern lamps within 30-60 seconds only.
The Importance of Timing
One may ask whether it is okay to cure the gel polish without considering the necessary curing time. The answer lies in the risk of leaving nails too soft and prone to peeling or chipping by applying an insufficient duration. On the contrary, over-curing can result in brittle or dull polish. Therefore, it is crucial to follow the required timing for each of the lamp layers.
Once you understand how to cure gel polish correctly, you will see perfect nails and avoid any potential issues.
Factors that Determine Curing
Type and Wattage of Lamp
It is possible that you have often wondered why the lamp is so important when curing your gel polish. This is explained below.
LED lamps only take 30 to 60 seconds whereas UV lamps will take 2 to 3 minutes.
It is important to remember the wattage of the lamp. When using a lamp that is of low wattage, it may become impossible for you to cure your polish.
In case of LED lamps, you should have a lamp of minimum 36 watts. The optimal wattage for good results would be between 36 to 48 watts.
With LED lamps, one has less heat and is thus more comfortable. UV lamps may be warmer, especially when using thick polish.
Using the appropriate wattage will result in better nail polish durability.
Formula of Gel Polish
Different gel polishes have different formulas. Cure time of gel polish varies according to the contents of the product. If there is more color in the gel polish then its curing process will take more time because it means more pigment is used in its formula. Thicker and colored gels require longer curing time while clear or less pigmented gels have shorter curing time because of their contents.
The reason behind all of these is the presence of different ingredients in the formula of different gel polishes. That is why always keep in mind that your gel polish might be different from other gel polishes.
Spessore dell'applicazione
The thickness of each application is very important. If the application is thick, the upper part may harden, but the bottom portion will remain soft. This is due to the fact that the light fails to penetrate through to the bottom part. The upper part gets exposed to excess light, while the lower one does not.
It is also important to note that thin layers will enable light to pass through the layers for proper curing to make it strong and durable. If you want to avoid peeling and chipping, then you need to put thin layers of gel nail polish.
Suggerimento: Clear gels typically take less time to cure compared to those that have color. For speedy results, use a clear or light-colored gel.
Controllare se lo smalto gel è polimerizzato
Segni di una corretta polimerizzazione
You definitely want to enjoy your manicure for as long as possible, which means being able to recognize when your gel polish is correctly cured is crucial. When cured properly, gel polish will have a polished, non-sticky finish. Some of the indicators that your gel polish is cured are listed below:
It feels dry and hardened upon touching.
Polish looks glossy and is non-sticky.
Nail can be gently pressed on without making a dent.
Color of polish is evenly distributed and vibrant.
Should you come across any tackiness or softness, then you should subject your polish to UV light for an additional period of time. There are instances where the clear coat may still appear tacky after it is cured by the UV light. Don’t worry about it since you will be removing the clear coat with alcohol at the end of the process.
Suggerimento: Remember to check each nail prior to applying the next layer.
Over-Curing and Under-Curing Dangers
What makes cure time so important? In case you under-cure your polish, your nails will remain soft and vulnerable to peeling and chipping. Over-curing might lead to other problems. Exposing your nails to the light too long is dangerous for both the condition and appearance of your nails.
These are some of the effects that could arise from over-curing gel polish:
The nails become dry and dehydrated.
There will be white patches or spots appearing.
Brittleness and nail splitting.
The nails would peel and flake.
Breakage and the absence of shine.
Sensitive nails with ridges.
Effetto sulla salute delle unghie
Descrizione
Assottigliamento delle unghie
Le unghie si assottigliano dopo l'uso ripetuto dello smalto gel.
Debolezza
Le unghie diventano deboli e si rompono facilmente.
Fragilità
Le unghie si spezzano e diventano fragili.
Pseudoleuconichia
Sulla superficie dell'unghia compaiono macchie bianche.
Onicoschizia
Gli strati dell'unghia iniziano a separarsi.
Se volete unghie forti e sane, seguite sempre i tempi di indurimento raccomandati. Controllare le unghie dopo ogni strato aiuta a evitare questi rischi e a mantenere la manicure fresca.
Suggerimenti per ottenere i migliori risultati
Curing Process in Steps
In order to ensure that your manicure lasts, you have to adhere to certain curing guidelines whenever you apply gel polish. Follow the steps below to achieve professional-looking nails at home:
Preparare le unghie Cleanse your nails. Strip off old polish from the nails. Push down the cuticles and smooth the nails.
Forma e pulizia File your nails to the desired shape. Wipe them clean with isopropyl alcohol.
Applicare un sottile strato di base Take the brush and hold it horizontally, then begin from the cuticle. Gently press the brush towards the cuticle and drag downwards in one motion. Maintain thinness and consistency when applying the base coat. Cure under the lamp according to the instructions.
Apply Thin Coats of Color Apply each coat thinly but evenly. Ensure there is a tiny bit of gap left from the cuticle and sides. Completely cure each layer before moving to the next coat. Should the color be difficult to apply, use white first.
Use a Top Coat Top off with the top coat. Remember to seal the edge of the nails as well. Cure fully and remove sticky layer if present.
Suggerimento: Utilizzate sempre una lampada con il giusto wattaggio per lo smalto gel. Verificate la tenuta delle unghie picchiettandole: devono risultare dure e lucide.
Errori comuni
Perhaps you’ve been asking yourself why your gel manicure lifts and peels. Here are some of the mistakes that many people commit when doing a gel manicure:
Putting on heavy gel polish. Thick layers do not dry properly and may form creases.
Not avoiding contact with cuticles. It can lead to peeling and lifting off.
Failing to prep the nails. Nails need cleaning, buffing, and shaping for better adhesion of the polish.
Wrong lamps and lack of checks. Incorrect wattage and bulbs create softer nails.
Too much curing or not enough. Excess time makes the nails brittle while lesser time makes them sticky.
Nota: Always stick to the recommended curing times and use thin and well-applied coats. As a result, you will avoid having bubbles, chipped and uneven nails.
Understanding the significance of each stage in the process of manicure makes one produce high-quality results every time.
The objective would be to create healthy nails along with having a long-lasting manicure that had no flaws whatsoever. For one to do this, the key is to ensure that the nails polish you use cures for a period of time that is recommended using the appropriate curing light. Thin layers of nail polish as well as checking on its shininess would ensure there was no peeling and chipping of the polish.
Suggerimento: Wash your nails, apply thin coats and fully cure gel polish.
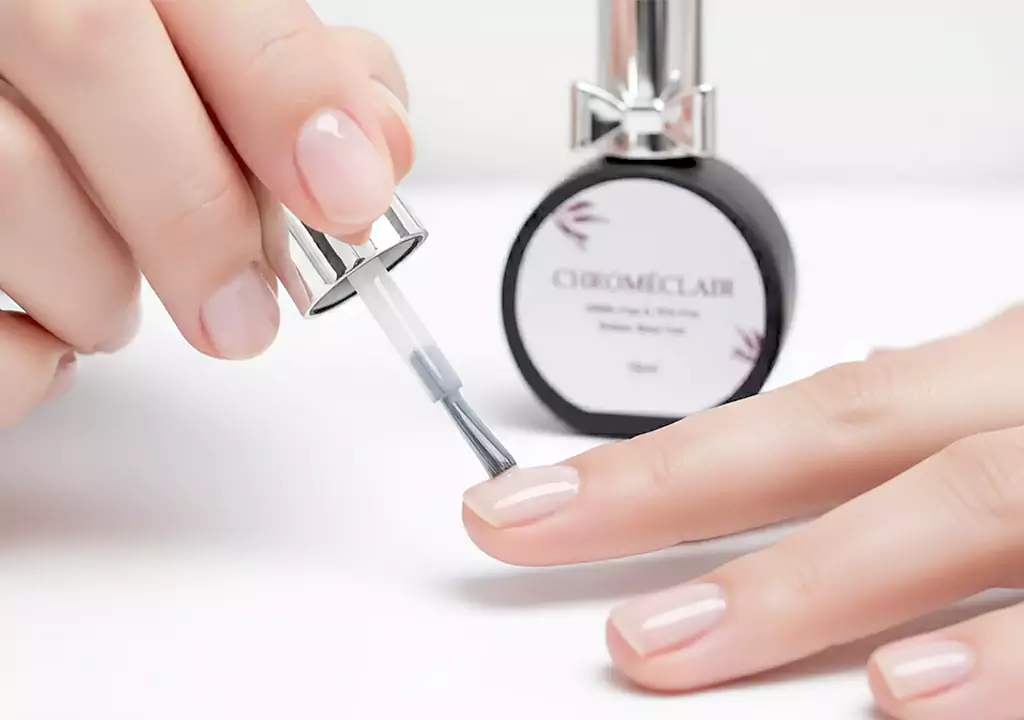
About the Brand
This new formula by chroméclair has proven itself “dual-free” – meaning that it is free from any HEMA and TPO. This does not only mean that the product is stripped of some unnecessary substances but that the entire approach to maintaining health of the nails undergoes a complete transformation into something brand new. The end result is less likelihood of allergy with the added benefits of proffessional polish for your nails.
FAQ
Why is it necessary to cure gel polish with a lamp?
It is necessary to use the lamp because curing is the process of making the polish dry and glossy. During the curing process, the ingredients of gel polish are being processed. Otherwise, gel polish remains soft and starts coming off.
Why does the wattage of the lamp influence the curing process?
The wattage of the lamp affects the result of curing and determines its efficiency and speed. Higher wattage provides perfect results, while low wattage produces sticky nails or makes them chip.
Why should one apply thin coats of gel polish?
Applying thin coats ensures that light penetrates everywhere. The thick coats remain soft beneath and peel off. By applying thin coats, you will have smoother and longer-lasting nails.
Why is the gel polish sticky even after curing?
The tacky layer created by the top coat of the gel polish could cause it to appear sticky even after curing. This should be removed using alcohol after curing to make it glossy.
Why are some gel polish colors harder to cure than others?
Darker pigmented colors absorb light more hence taking much longer to cure. Light-colored pigments allow light to penetrate easily making them cure quickly.