Want a dreamy and unique manicure? Today, I’ll teach you how to create a stunning “Colorful Butterfly” manicure. Follow the steps and you’ll easily achieve the same look!
Fase 1: Applicare un prodotto nero mano di fondo
First, take out black gel polish (I’m using my go-to, CHROMÉCLAIR’s Smalto gel senza HEMA (prodotti n. 03; il colore è trasparente, scorre facilmente ed è atossico e salutare!) e applicare uno strato uniforme sulle unghie. Questo passaggio permette ai colori e agli effetti successivi di apparire meglio, fornendo una base solida per l'intera manicure.
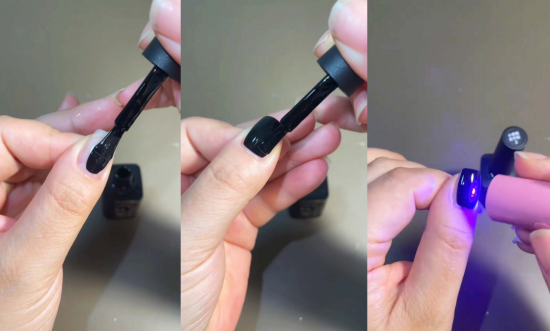
Step 2: Layer Cat’s Eye Gel Polish
Next, choose a white or silver cat’s eye gel polish (I used CHROMÉCLAIR’s Smalto gel senza HEMA products No. 437) and apply a layer over the black base. Once this layer is dry, use a cat’s eye magnet to remove the shine. This will allow you to create the texture later.
Recommended next step
Build the Nail Art Look Kit
Tutorial looks need more than a color bottle. Choose the color, art detail, transfer or sticker step, and a top coat as one look kit.
- Choose the main color or set.
- Add the art detail: sticker, transfer gel, magnet, or brush.
- Seal the finished look with top coat.

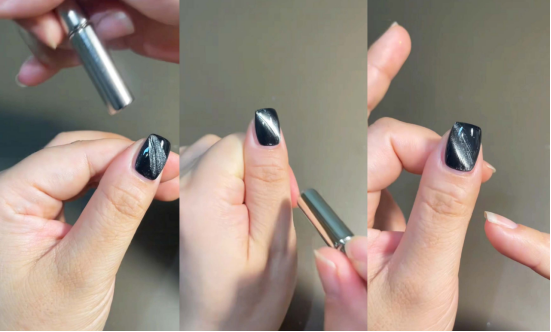
Fase 3: Disegnare le linee con una penna per disegnare le linee
Take out a line drawing pen and, starting at the corner of your nail, draw lines in the desired direction. Don’t aim for perfectly regular lines; just draw a variety of long and short lines to create a natural, sunlight-like effect on your nails.

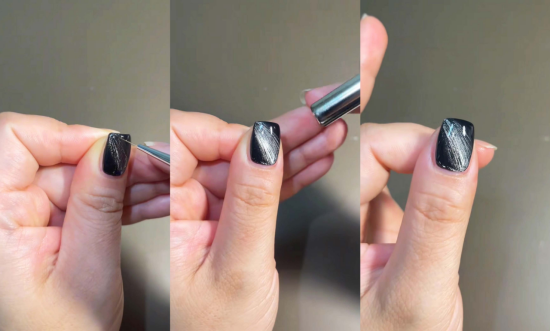
Fase 4: Disegno e forma della luce (senza illuminazione)
Utilizzare una calamita per attaccare la luce cat-eye al centro dell'unghia. Importante: Non utilizzare l'illuminazione per questo passaggio.
Quindi applicare un altro strato di smalto gel e ripetere il processo di copertura dalla luce al centro. Questo renderà la manicure più stratificata, come se luci e ombre scorressero sulle unghie.
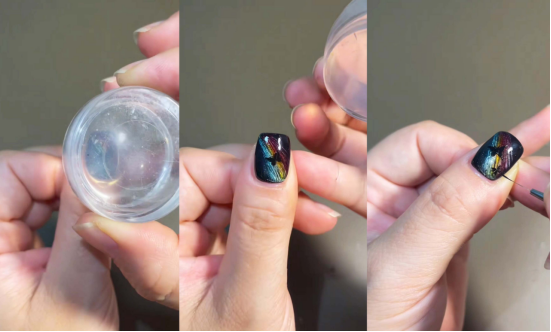
Fase 5: Stratificazione della colla traslucida + rinforzo
Dopo l'indurimento sotto la lampada, selezionare diverse colle trasparenti e applicarle una ad una sulle unghie per creare un colore più ricco e vario.

Applicare quindi uno strato di colla rinforzante per avvolgere l'effetto della nail art precedente, che non solo protegge la nail art ma rende anche l'aspetto complessivo più strutturato.

Step 6: Butterfly Stamping & Seal
Utilizzate un timbro a farfalla e imprimete un motivo a farfalla sull'area desiderata dell'unghia (per istruzioni dettagliate su come utilizzare il timbro, consultate il mio tutorial sulla manicure con timbro a quadri). Potete anche aggiungere una piccola farfalla per aggiungere un dettaglio.
Applicare uno strato sigillante su tutte le unghie e farle brillare sotto una lampada per rendere la manicure più duratura e lucente.

Follow these steps and you’ll have a gorgeous and exquisite “Colorful Light Butterfly” manicure! The colorful light effect paired with the lively butterflies is super eye-catching whether you’re out and about or for a special occasion. Give it a try!
Per altri tutorial di nail art iscrivetevi a me:
https://www.youtube.com/channel/UCI0m-W9pTdU_YvTQLbOLb4Q

Finally, we recommend CHROMÉCLAIR’s Smalto gel senza HEMA products: they focus on safety, are low-irritation, environmentally friendly, do not contain harmful ingredients, reduce the risk of allergies (do not contain HEMA & TPO), have a variety of colors, cater to mainstream aesthetics, are designed specifically for users with sensitive skin, care for healthy nails, and ensure that every consumer’s experience is safe and secure.